Troubleshooting NordVPN: Netflix Not Working in 2025
Quick Answer: Get Netflix to work on NordVPN
If NordVPN isn’t accessing Netflix, try switching servers, clearing your browser’s cache and testing the VPN for leaks. If all else fails, try another VPN — I recommend Surfshark or ExpressVPN.
Whether you want to access Netflix U.S. content from abroad or another country’s Netflix library from the U.S., using a VPN service is no doubt the best way to do it. Although NordVPN is one of the best VPNs for Netflix, and I can easily watch Netflix with NordVPN, every now and then it just doesn’t work the way I want it to. Problems can occur with any VPN provider, but knowing how to solve those problems can make the whole situation less stressful.
This article will talk about common problems that can arise while using a VPN for streaming. I’ll also include step-by-step instructions on how to troubleshoot NordVPN if Netflix is not working.
How does Netflix block VPN services?
Netflix’s technology can check for inconsistencies in your connection, such as the DNS server location, as well as check to see if the IP address you’re using has already been associated with an unblocking tool. If Netflix thinks you’re using an unblocking tool, it blocks the IP address. It doesn’t actually block the VPN provider, though, so you could connect with a different server.Is NordVPN the best VPN to access Netflix?
NordVPN can access Netflix easily and it has the features needed to do so with ease. That said, ExpressVPN — the top best VPN service — is a better choice because of its faster speeds and greater reliability.Is there a free VPN that works with Netflix?
Windscribe is the best free VPN for Netflix. It has a totally free plan that will get you into Netflix. Keep in mind, though, that you’ll be limited to a handful of server locations, speeds may be slow, and its bandwidth is capped at 10GB per month.
Why Won’t NordVPN Work With Netflix?
Netflix has a really nifty and annoying security feature that tries to spot users who are connecting with an unblocking tool. That’s because the service only wants you to see content from the country you’re physically located in. So, if Netflix finds that the IP address you’re using is linked to an unblocking tool, it’ll block the IP.
The thing is, even though VPN services can have thousands of IP addresses at the ready, some of them will be known to Netflix and will be blocked instantly. You’ll see the lovely Netflix error code m7111-5059 and you won’t be able to watch Netflix.
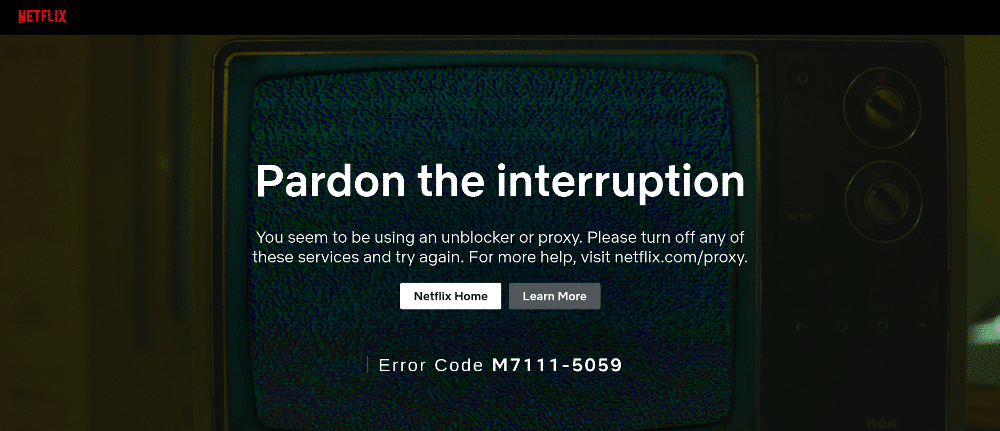
In order to bypass the Netflix proxy error, you need a reliable VPN. Fast speeds and unlimited bandwidth are top features to look for and will give you the best streaming experience, but you need to be able to unblock Netflix first.
A Netflix-capable VPN service will have tens of thousands of IP addresses at the ready and it will also update those IP addresses regularly. That will give you the best chance of connecting with an IP address that’s not on Netflix’s blocked database.
I often use NordVPN with Netflix. It has more than 5,000 servers worldwide and each of those servers has multiple IP addresses. More than 1,900 of those are U.S. servers, so you should have no problem finding a Netflix-compatible IP address with NordVPN. Plus, you get fast speeds and unlimited bandwidth.
5 Steps to Troubleshoot NordVPN: Netflix Not Working
If you have issues unblocking Netflix with NordVPN, you can try a few things that will help you get Netflix working with NordVPN again.
Switch to a Different NordVPN Server
When you connect to a NordVPN server, you’re allocated a random IP address from that server. As I mentioned earlier, that means you could be assigned an IP address that’s already blocked by Netflix. If that happens, you just need to get a new one. I’ll show you how.
The Steps
1. Go to the NordVPN app
In the NordVPN app, look for the country that you want to connect to by using the list on the left or the search bar.
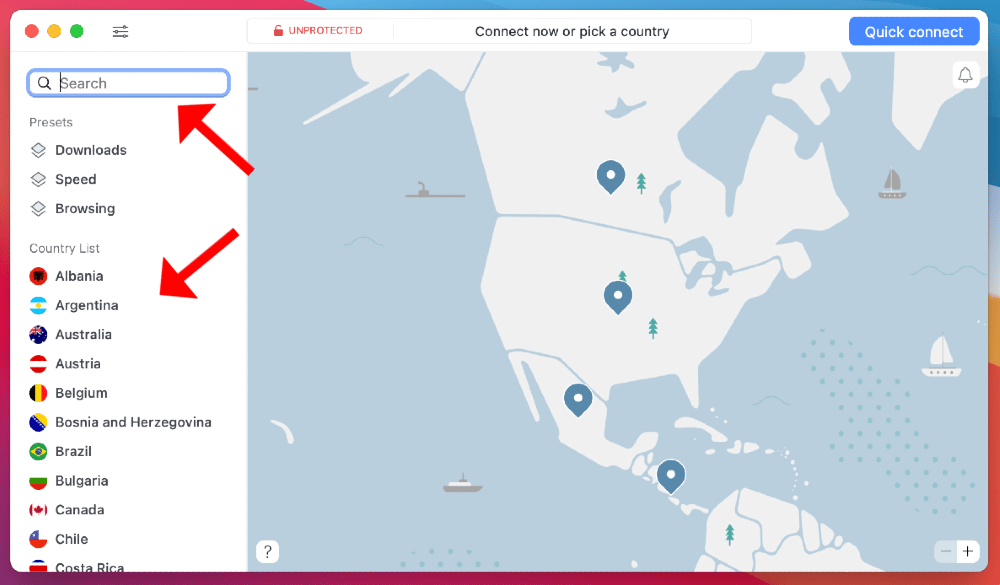
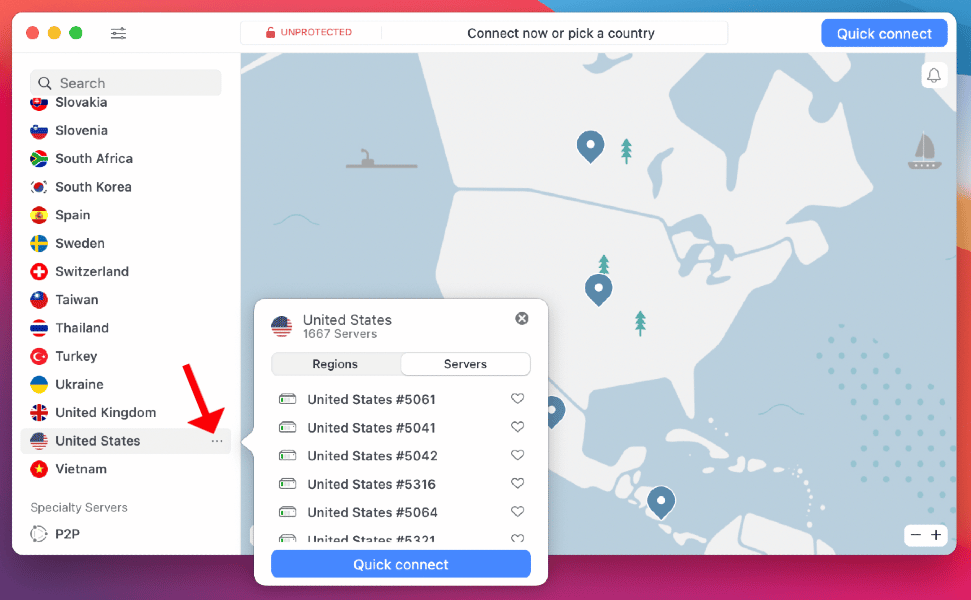
2. Click the three dots to select a specific server
When you find the country you want, do not click on the country’s name, as that will connect you to a smart server — and possibly the one you were already connected to. Instead, click on the three dots next to the country. That will show you all the locations and servers for that country. Choose a different server and try to access Netflix again and start streaming.
Clear Your Browser’s Cache
Netflix may be able to detect your location from information stored in your browser’s cache. To prevent that, it’s a good idea to clear your browser’s cache and cookies. Each browser is different, but you can usually find it in the browser’s settings. I use Google Chrome, so I’ll use that as an example. Other browsers should be similar and it’s pretty much the same on a mobile device, too.
The Steps
1. Go to your browser’s settings
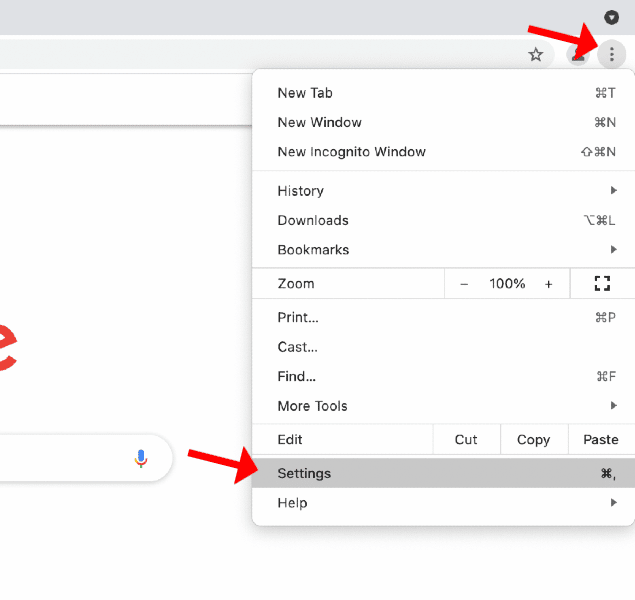
In Chrome, click the three dots in the top right corner and select “settings.”
2. Go to the “privacy and security” section
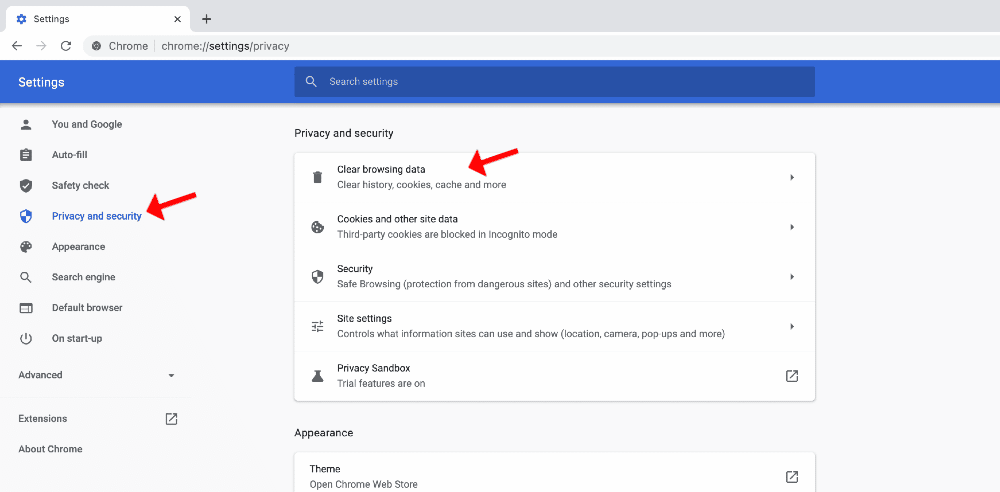
Click on “privacy and security,” then click on the “clear browsing data” section.
3. Clear your browsing data
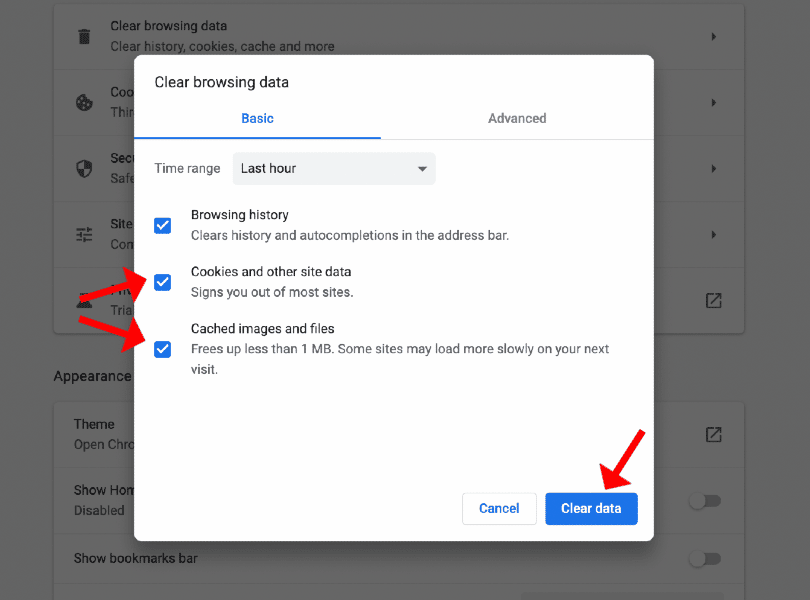
Ensure that both the “cookies and other site data” and “cached images and files” boxes are checked (they’re usually checked by default). Click “clear data.”
Check That Your Connection Is Not Leaking Data
If your internet connection is leaking data, Netflix may be able to see your true location. The most common leaks are DNS, IPv6 and WebRTC. Learn more in the DNS leak test guide.
With NordVPN, it’s easy to see if your VPN connection is leaking data or not. Once you’re connected to a NordVPN server, go to the NordVPN website and make sure it says “protected.” If it does, you’re fine. If it says “unprotected,” follow these steps until it’s resolved.

Prevent DNS Leaks
Native NordVPN apps will automatically use NordVPN’s own DNS servers when you connect. However, if you connect to NordVPN from a non-native app, such as a third-party OpenVPN client, you’ll need to set it to use the DNS servers manually. Occasionally, issues can arise when setting up the NordVPN app, and you may have to configure it.
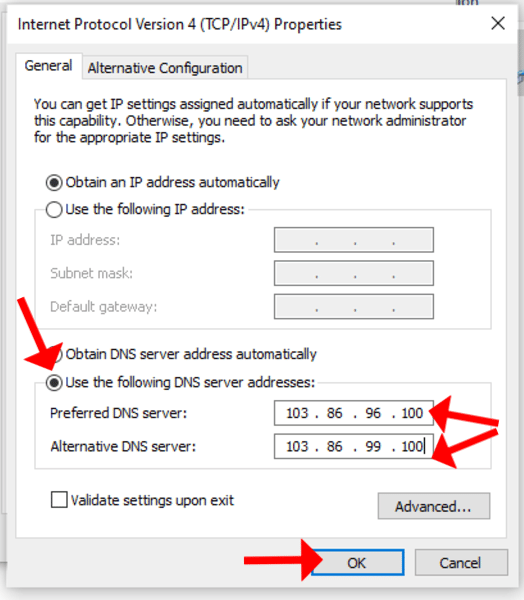
Using NordVPN’s DNS servers will ensure that DNS leaks don’t occur. The DNS server addresses for NordVPN are 103.86.96.100 and 103.86.99.100. I’ll show you how to manually set those server addresses for different devices.
However, before you follow the steps below, make sure you clear your browser cache or force quit any streaming app you’re using and clear the cache on that. Plus, when you’re done, you may need to restart the NordVPN app or your device for the changes to take effect.
The Steps to Stop DNS Leaks in Windows
1. Go to “open internet and network settings”
Right-click the network icon in the notification tray and click “open network & internet settings.”

2. Go to “change adapter options”
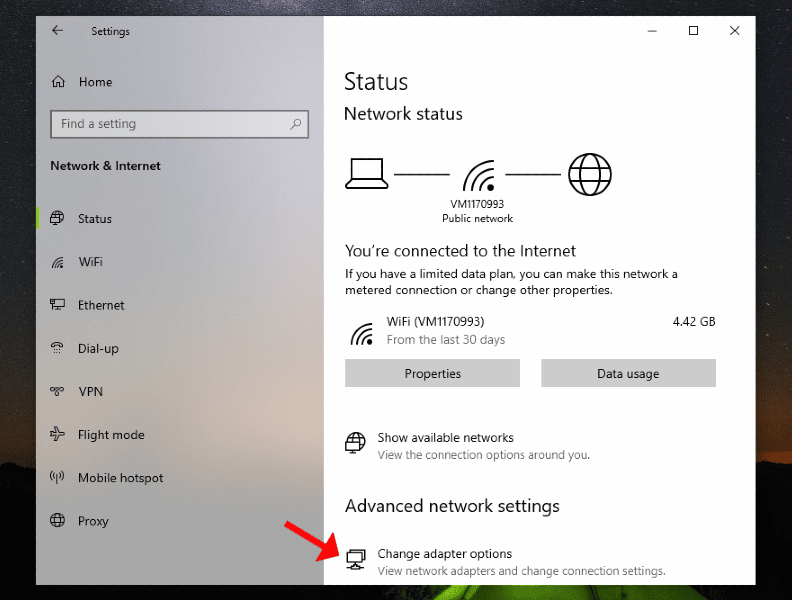
Click on “change adapter options.”
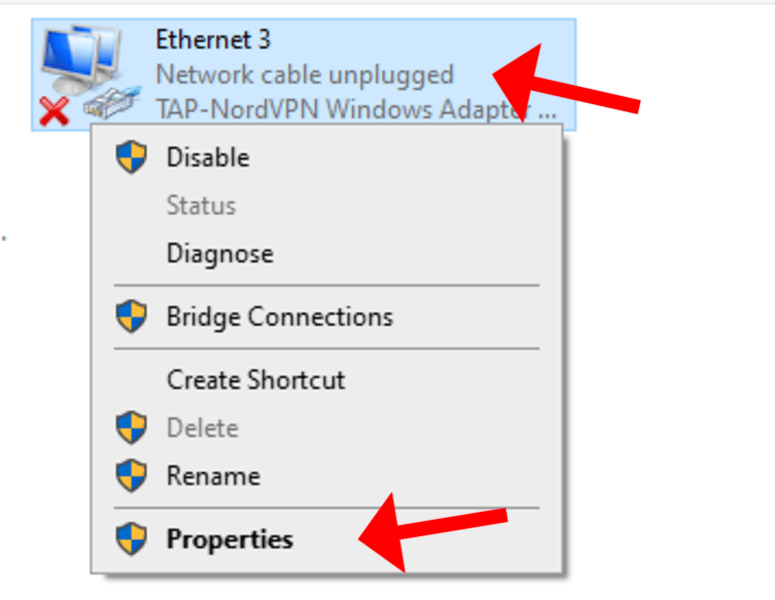
3. Go to “TAP-NordVPN Windows adapter V9”
Select “TAP-NordVPN Windows adapter V9” and then click “properties.”
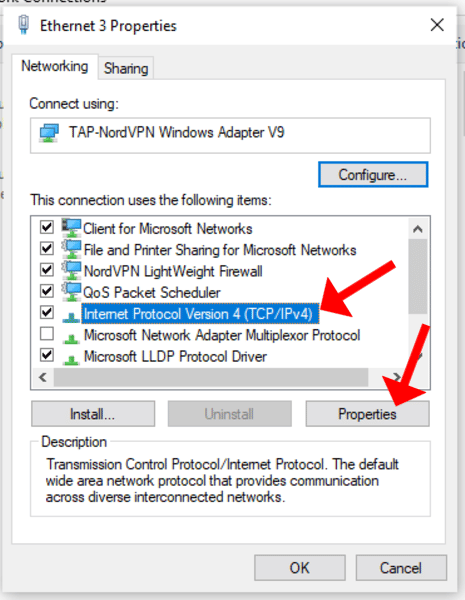
4. Go to “internet protocol version 4 (TCP/IPv6)”
Select “internet protocol version 4 (TCP/IPv6)” and then click “properties.”
5. Add NordVPN’s DNS server addresses
Select “use the following DNS server addresses” and enter NordVPN’s server addresses. Press “OK.”
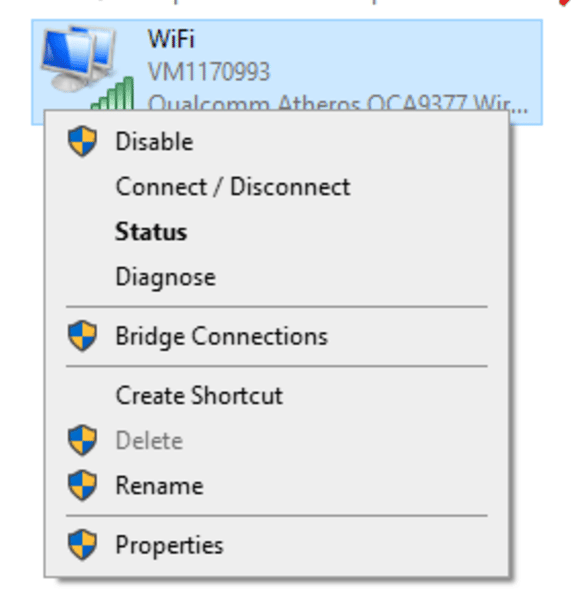
6. Repeat steps for other network adapters
Repeat steps three through five to enter NordVPN’s DNS server addresses for other network adapters in use, such as WiFi.
The Steps to Stop DNS Leaks in MacOS
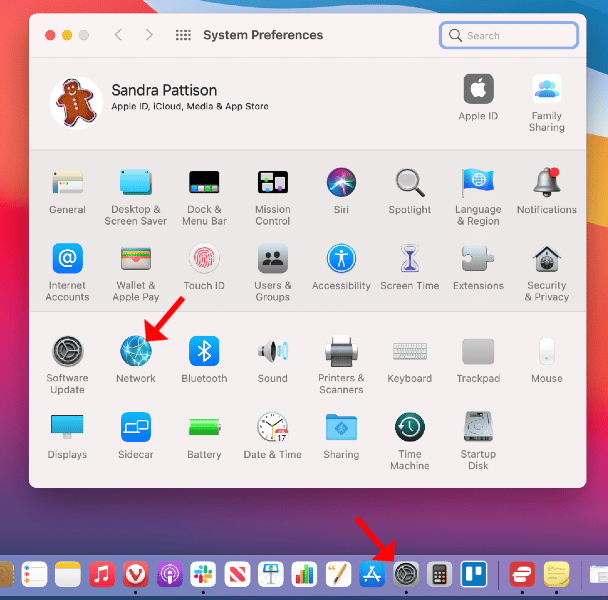
1. Go to system preferences
Click on the system preferences icon in the dock and then click on “network.”
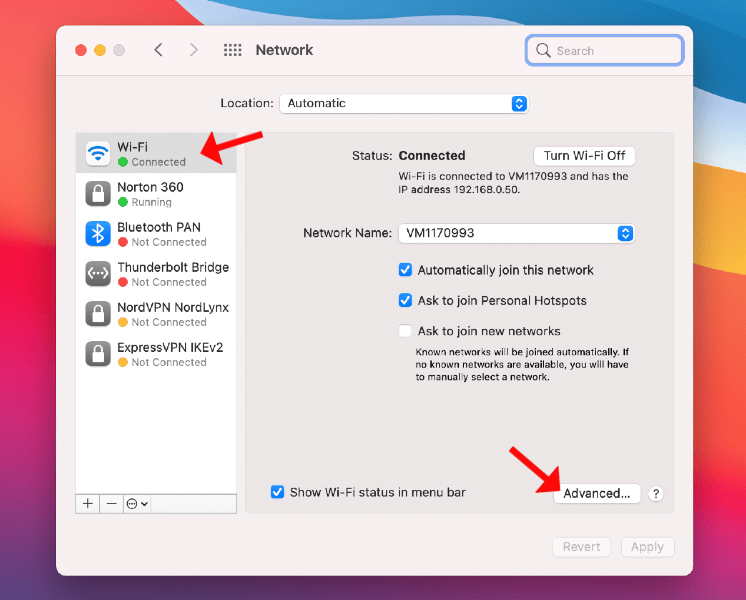
2. Select your network interface
Select the network interface you’re using and then click “advanced.”
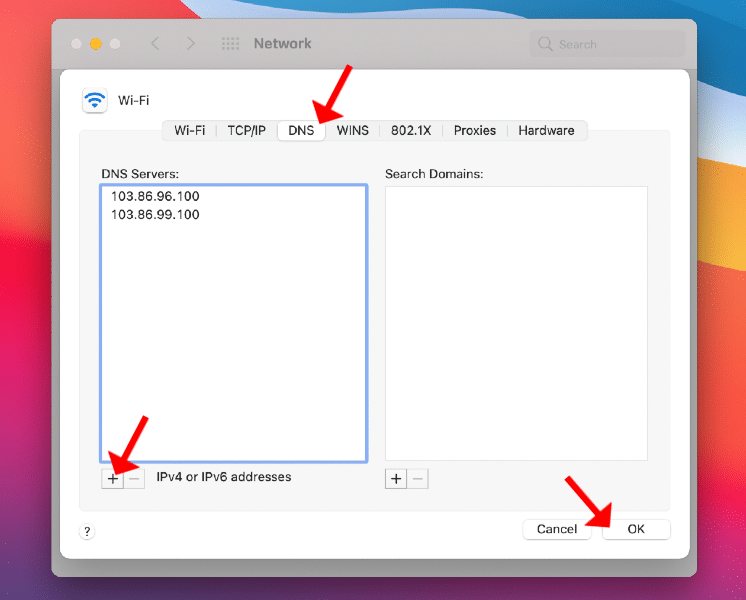
3. Go to the DNS tab and add the DNS servers
Click on the “DNS” tab and click the “+” button to add NordVPN’s DNS server addresses. Then click “OK.”
The Steps to Stop DNS Leaks on Android
Keep in mind that some Android devices and software versions may look a little different from mine in the settings menu.
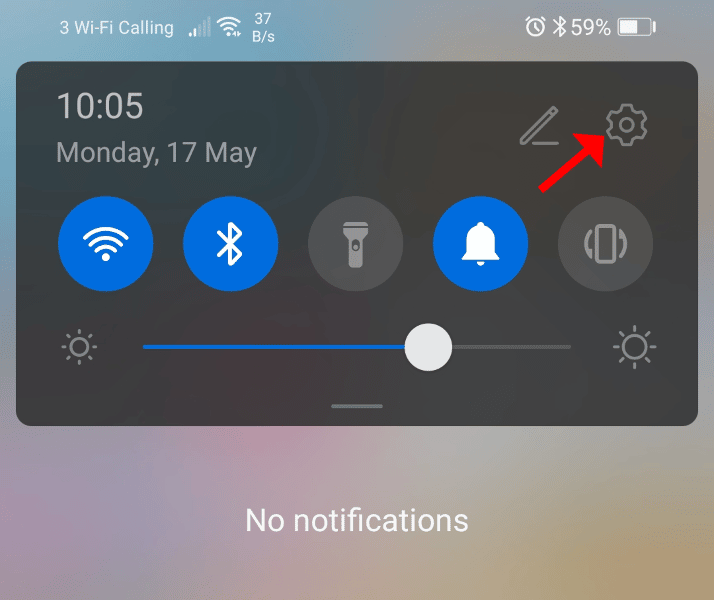
1. Go to your settings
Swipe down from the top and click on the settings cog.
2. Go to your connections
If you’re using Android 9 Pie or a newer version, go to “connections,” “open private DNS” and set it to “private DNS provider hostname.” Then insert one of NordVPN’s hostnames — dns1.nordvpn.com or dns2.nordvpn.com — then tap “save.”
For older versions, go to “connection,” tap “WiFi” and follow the rest of the steps.
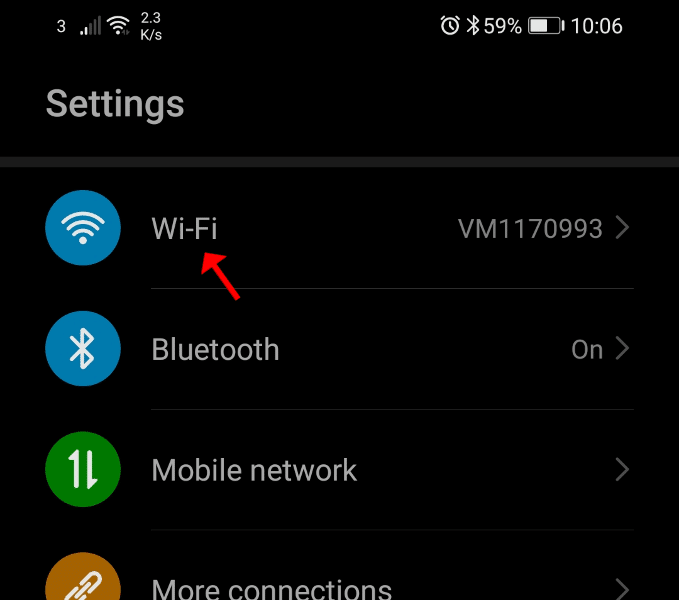
3. Go to your current network’s settings
On your current network, either tap the cog icon next to it and tap “advanced” OR press and hold the network and then tap “modify network.”
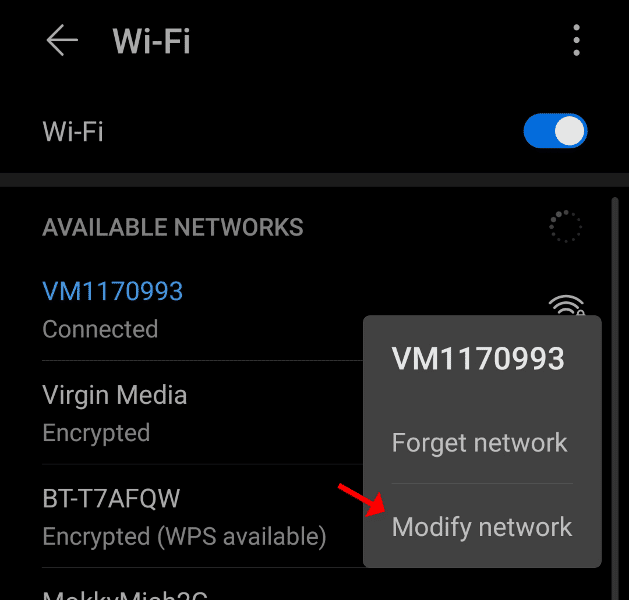
4. Set IP settings to static
Check the box for “show advanced options” if applicable. Tap “IP settings” and set it to “static.”
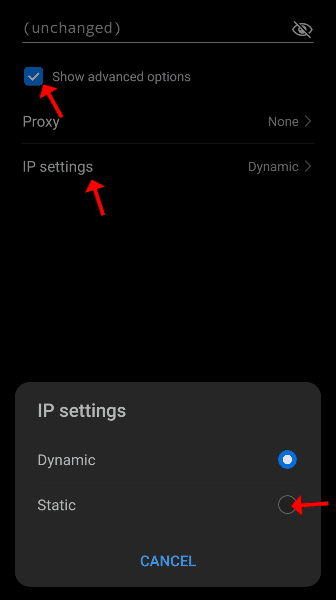
5. Input NordVPN’s DNS server addresses into the DNS fields
Enter NordVPN’s DNS server addresses into the “DNS1” and “DNS2” fields, and tap “save.”
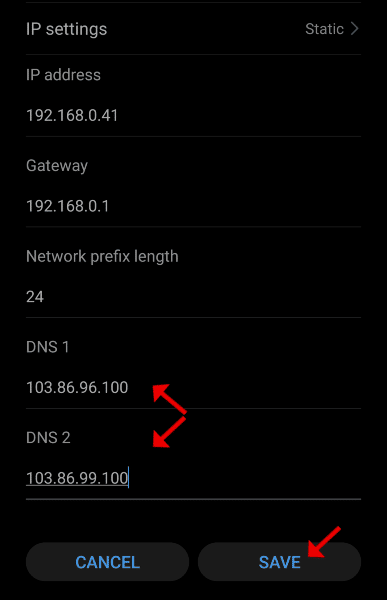
The Steps to Stop DNS Leaks on iOS
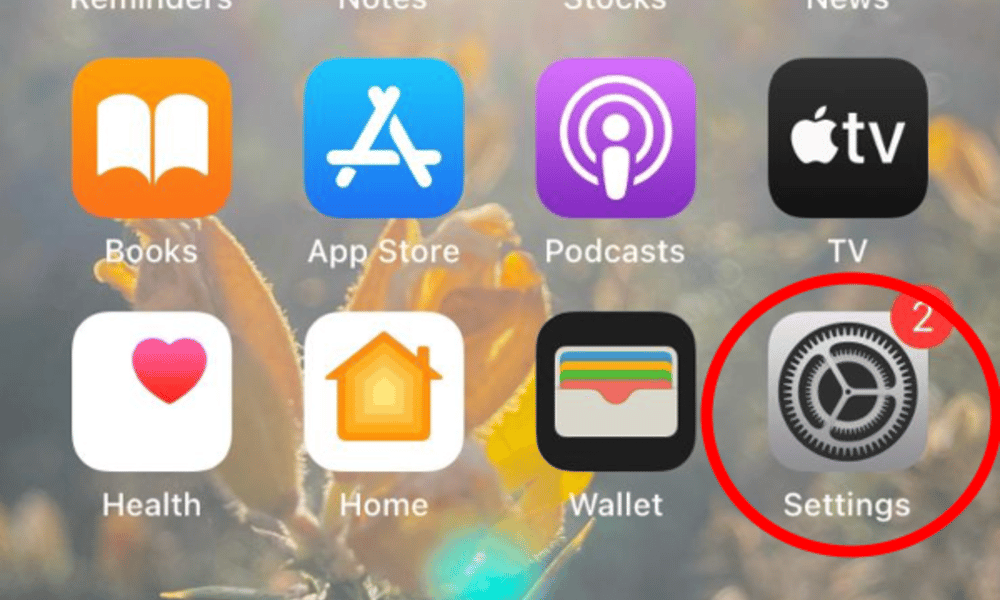
1. Go to settings
Tap the settings icon on the home screen.
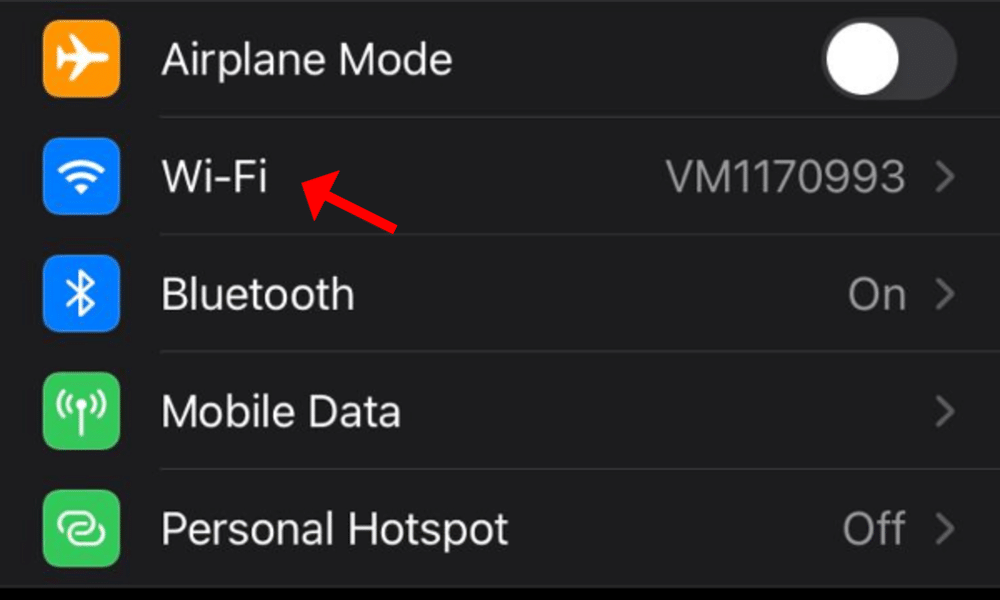
2. Go to “WiFi”
Tap on “WiFi” to go to the WiFi settings.
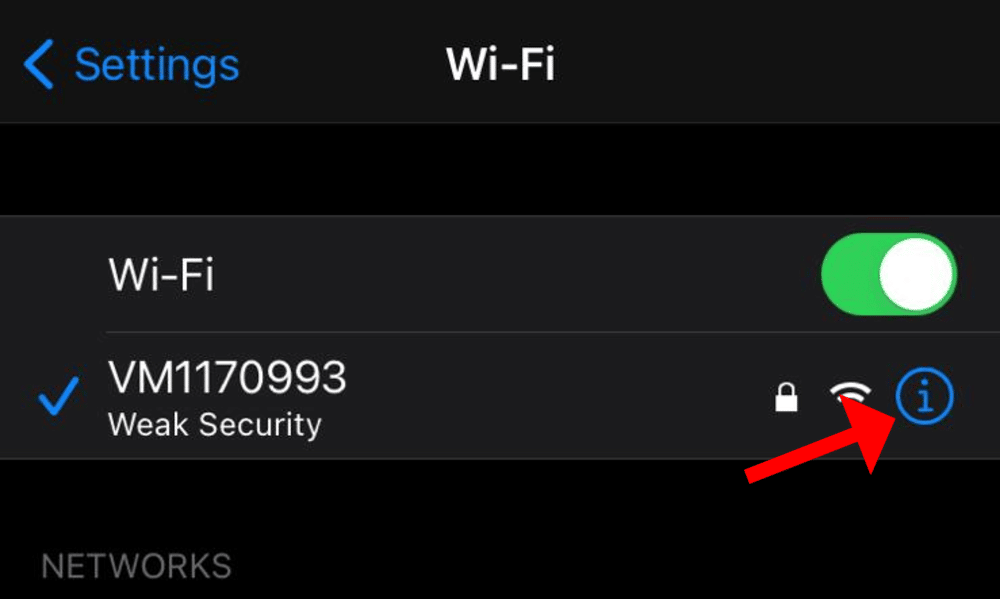
3. Tap the blue “i” icon
Tap on the blue “i” icon on the right side.
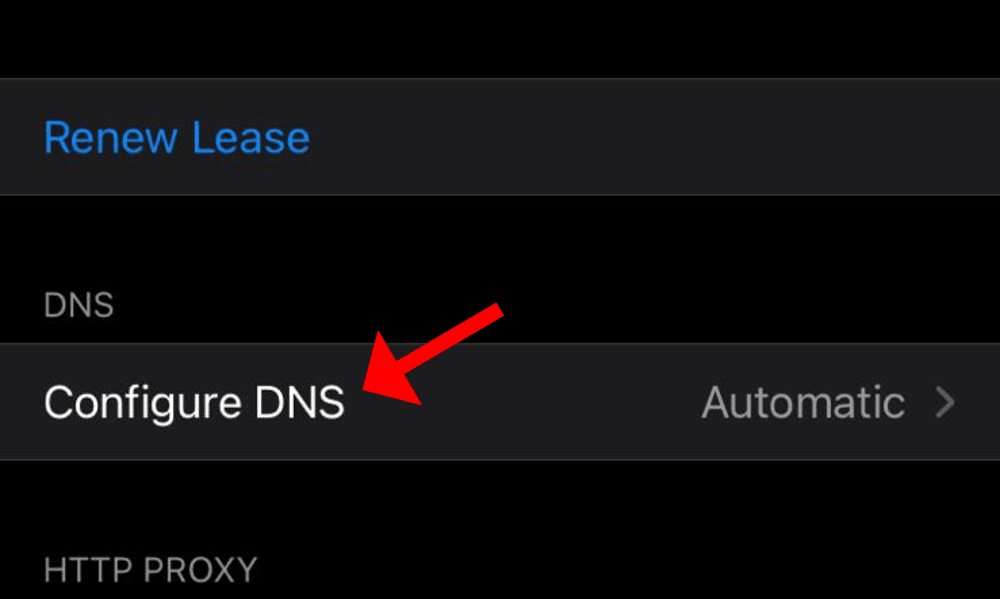
4. Go to configure DNS
Scroll down and tap on “configure DNS.”
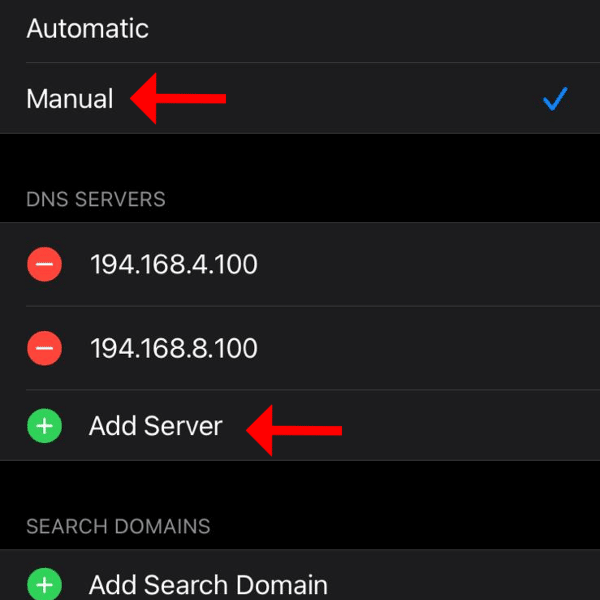
5. Go to “manual” and add the NordVPN DNS addresses
Tap “manual” and then tap “add server.” Now add NordVPN’s DNS server addresses and tap “save.”
Prevent IPv6 Leaks
Not all devices, networks and websites are IPv6 capable. However, if your ISP supports IPv6 and you connect to a website that also supports it, your browser can connect to an IPv6 address that’s outside of the VPN. That means it’s directly with your ISP and your true location is visible.
The Steps to Stop IPv6 Leaks in Windows
1. Go to the network and internet settings
In the notification tray, right-click the network icon. Click on “open network & internet settings.”

2. Go to the network and sharing center
Scroll down a little and click on “network and sharing center” (or “centre” if you’re a funny Brit, like me).
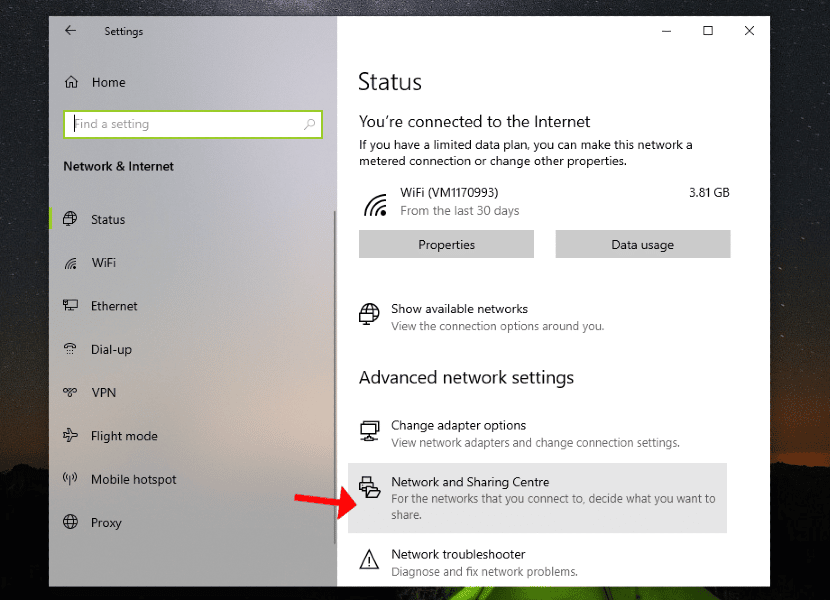
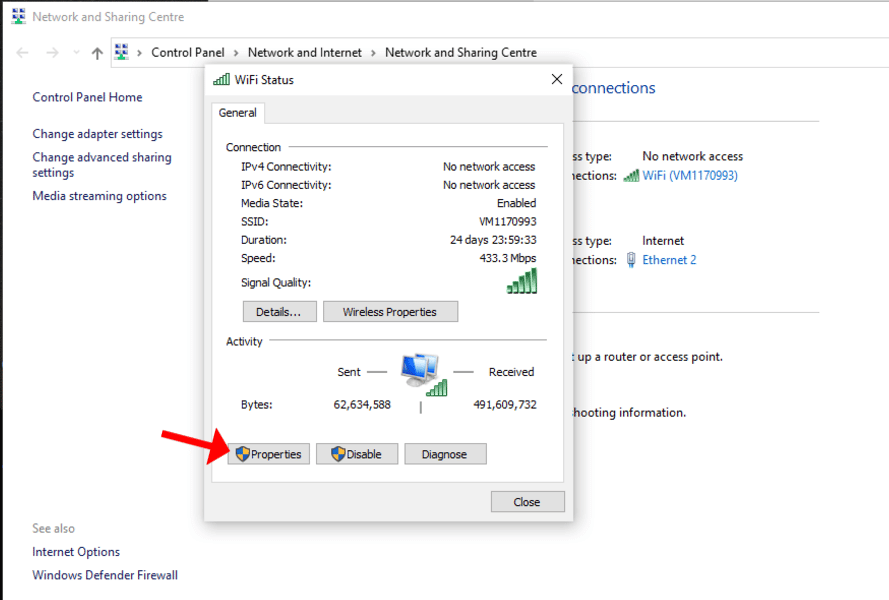
3. Select your network adapter and select properties
Click on your network adapter. A window will pop up; click on “properties.”
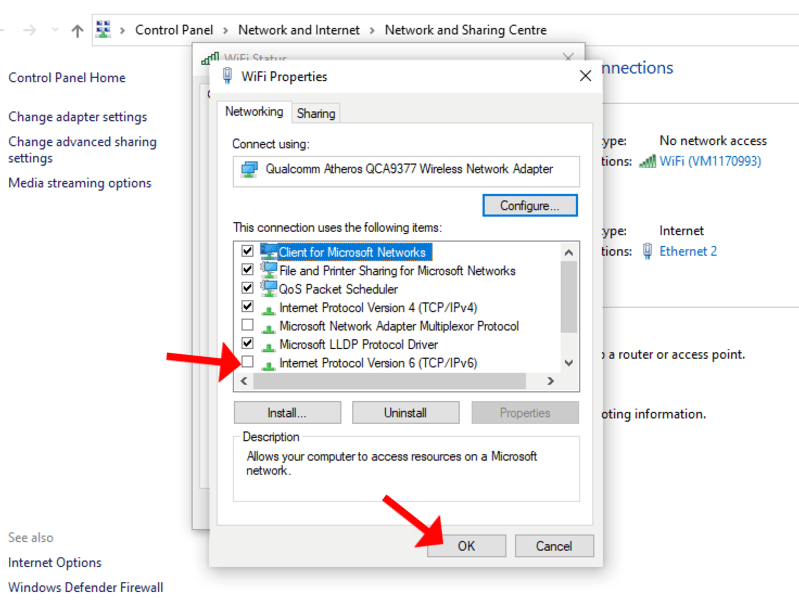
4. Uncheck the TCP/IPv6 box
Uncheck the box next to “internet protocol version 6 (TCP/IPv6).” Then click “OK.”
The Steps to Stop IPv6 Leaks on MacOS
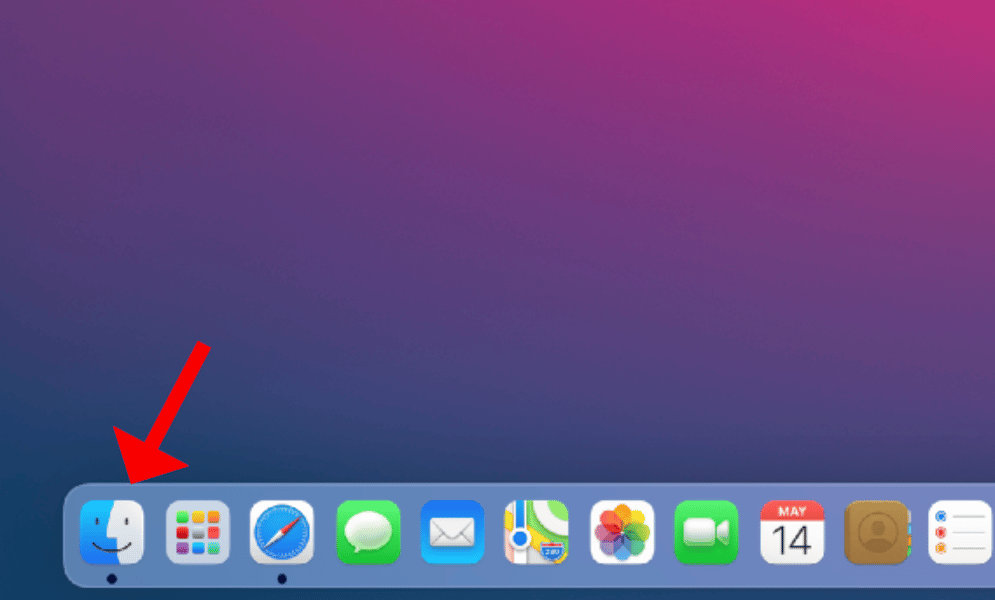
1. Open “finder”
Click on “finder” in the dock to open it.
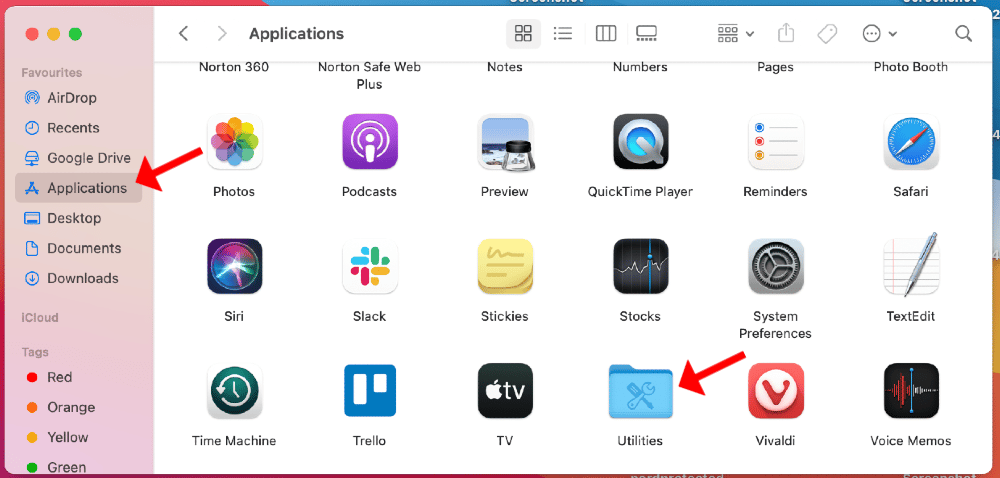
2. Go to applications
Click on “applications” in the left-hand column. Double-click the “utilities” folder.
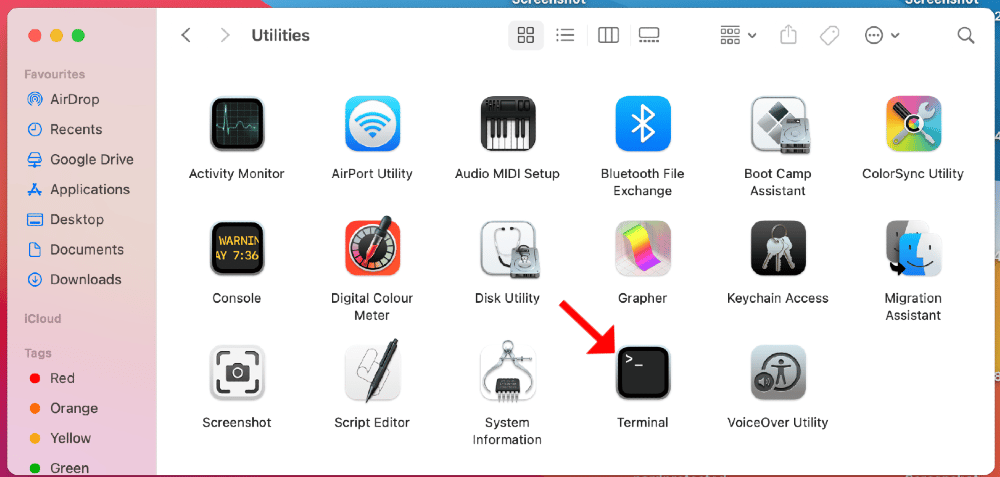
3. Go to the terminal app
Double-click on the “terminal” app.
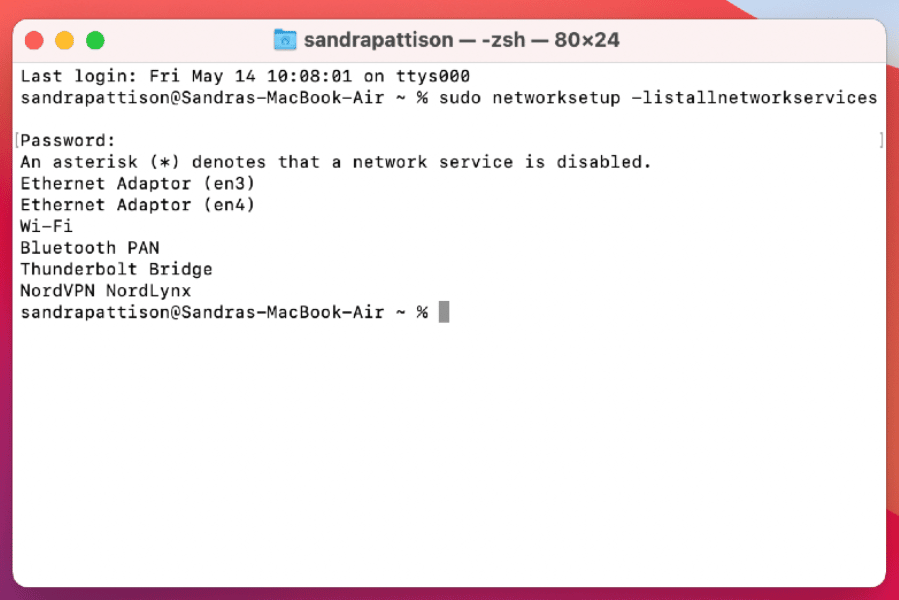
4. Run a command in the terminal window
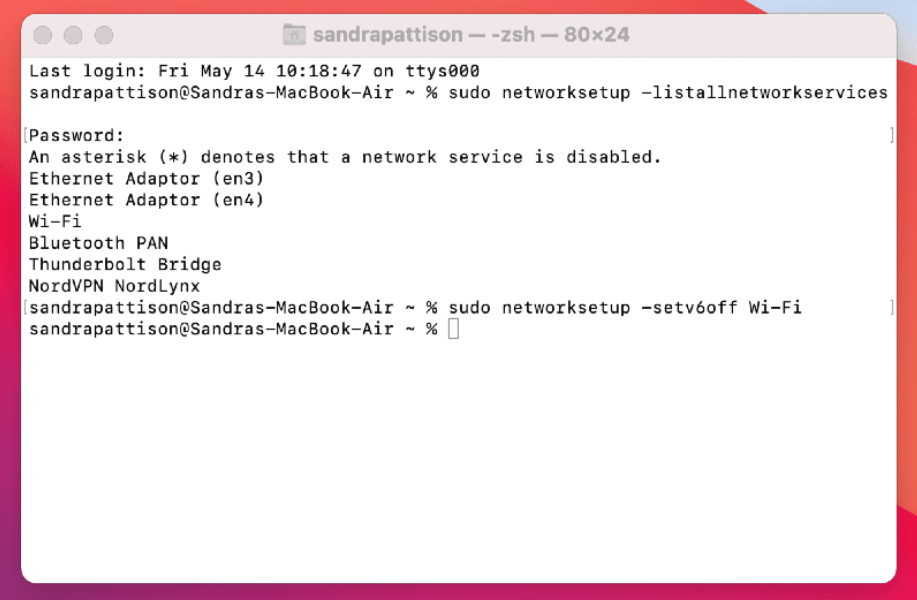
Copy and paste “sudo networksetup -listallnetworkservices” into the terminal window and press enter. You should now see a list of your network interfaces, but you may need to enter your administrator password.
5. Disable IPv6 on the network interface you’re using
Identify which network interface you’re using — usually WiFi or Ethernet. Copy and paste the relevant command into the terminal window: “sudo networksetup -setv6off Ethernet” or “sudo networksetup -setv6off WiFi.” Press enter and that will disable IPv6 on that interface, though you may have to enter your administrator password first.
6. How to re-enable IPv6
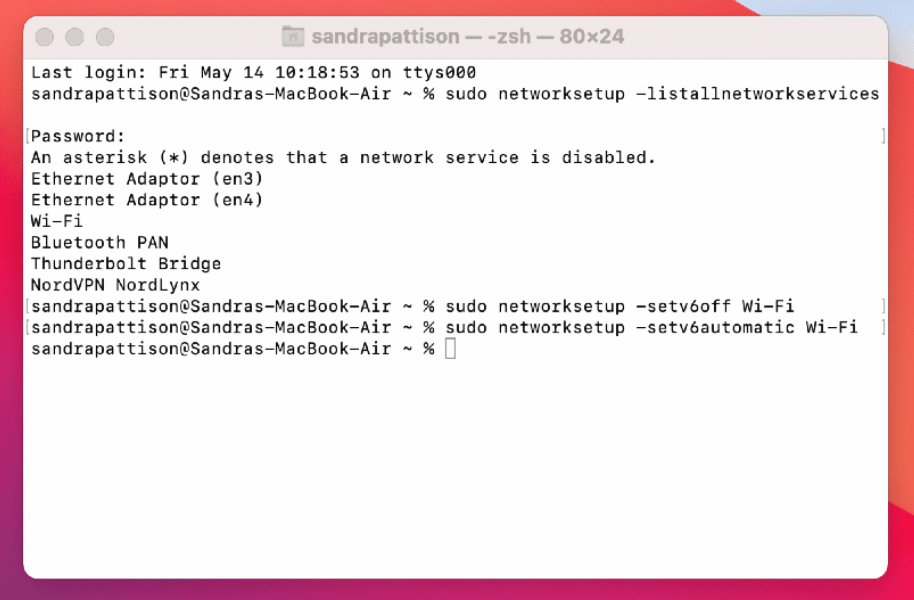
If you ever want to re-enable IPv6 on MacOS, copy and paste the relevant command into the terminal window: “sudo networksetup -setv6automatic Ethernet” or “sudo networksetup -setv6automatic WiFi” and press enter.
Prevent WebRTC Leaks
Occasionally, some browsers encounter WebRTC leaks. That can cause your true IP address to leak, even if you’re using a VPN. You can disable WebRTC leaks, though.
Stop WebRTC Leaks in Google Chrome
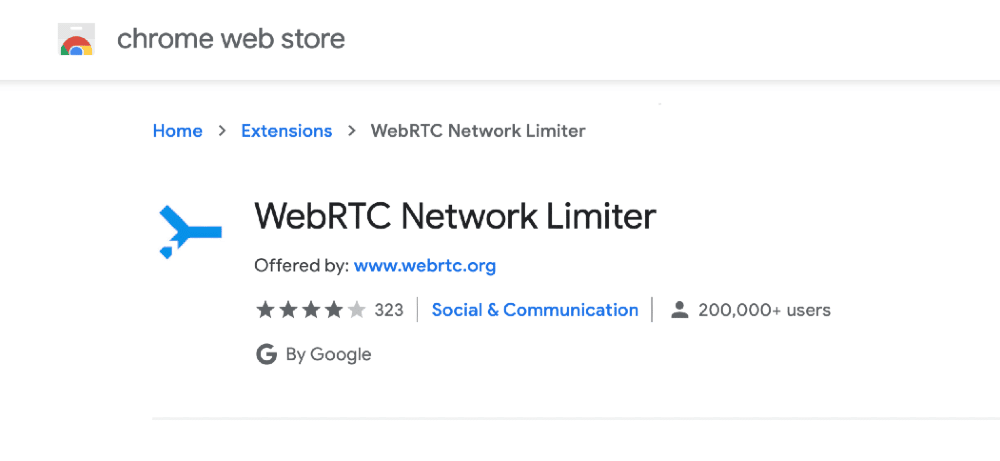
You can easily stop WebRTC leaks from happening by installing the WebRTC Network Limiter Chrome extension.
Stop WebRTC Leaks in Firefox
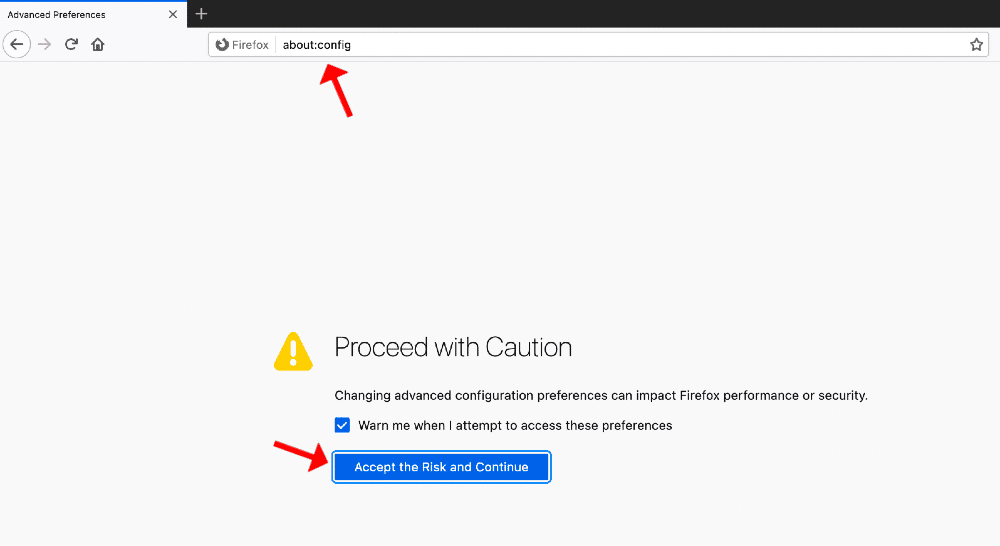
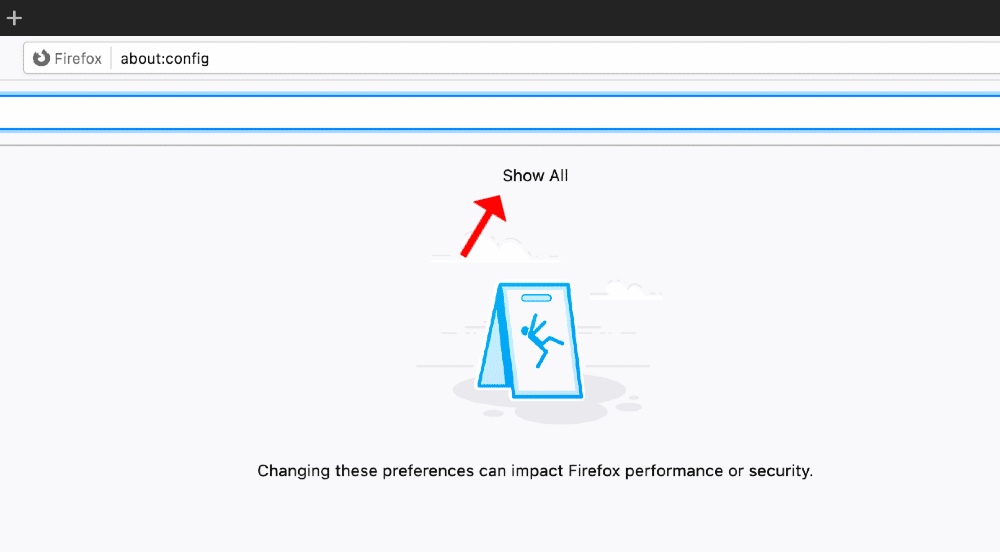
1. Go to about:config
Click on the address bar, type in “about:config” and press enter. A warning message will appear. Click “accept the risk and continue.”
2. Click “show all”
If a list doesn’t appear, click “show all.”
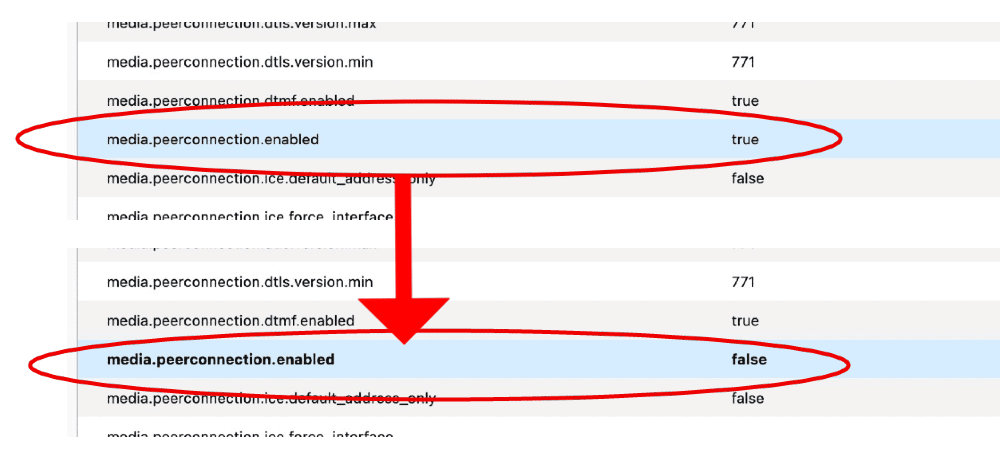
3. Disable media.peerconnection.enabled
Scroll until you find media.peerconnection.enabled and double-click it to set it to false.
Stop WebRTC Leaks in Safari
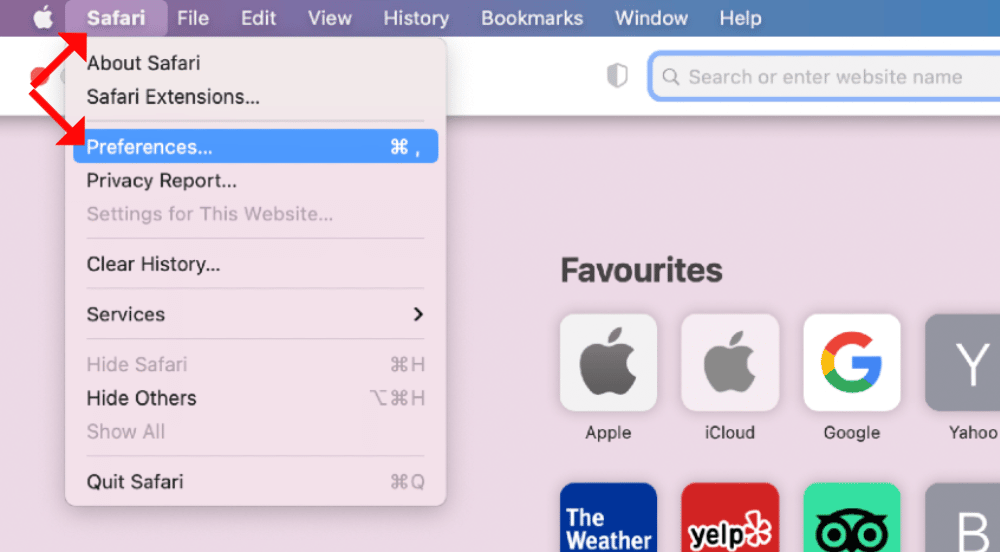
1. Go to preferences
Click the Safari icon and then click “preferences.”
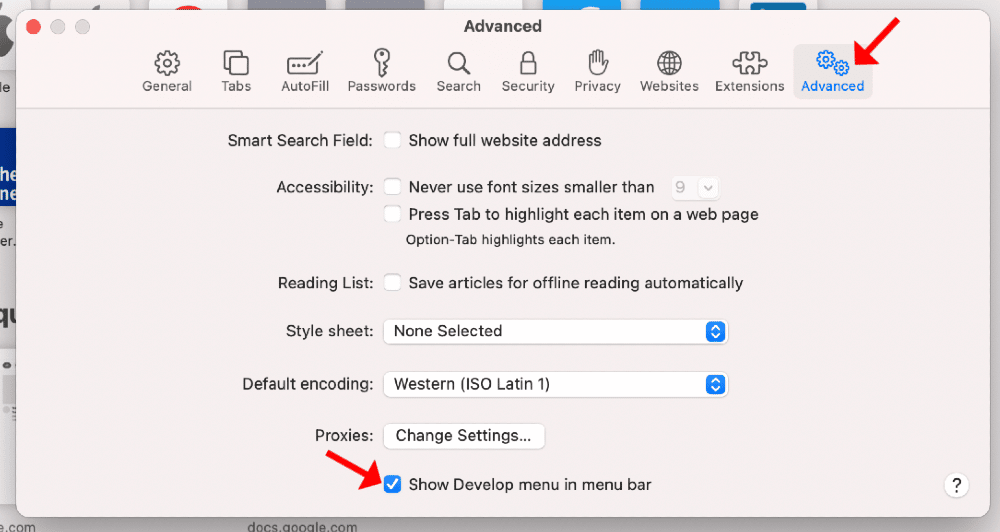
2. Go to advanced
Go to the advanced tab and check the box next to “show develop menu in menu bar.”
3. Disable WebRTC
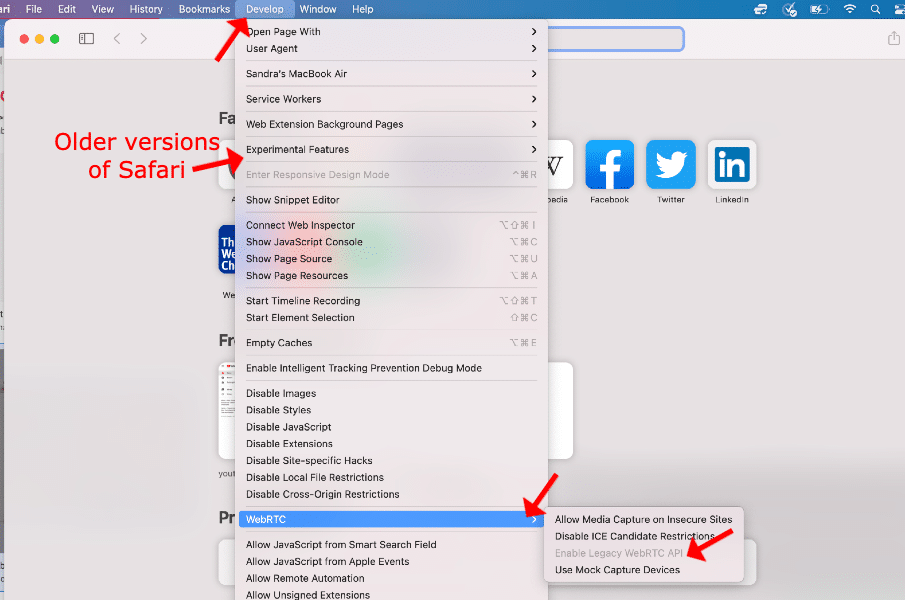
You’ll now see a new “develop” tab in the menu bar — click on it. The next step will depend on which version of Safari you’re using.
In older versions of Safari, go to “experimental features” and scroll down until you find “WebRTC mDNS ICE candidates.” Uncheck it to disable it.
In the newer version of Safari, go to “WebRTC” and uncheck “remove legacy WebRTC API.” To re-enable it, simply recheck it.
Why Netflix Blocks VPN Providers
Netflix doesn’t just block content out of spite — there’s a legitimate reason for it. It doesn’t have the rights to air certain content in some countries. Netflix is bound by copyright and licensing agreements, so if a user watches something that’s not available in their region, Netflix is violating those agreements — even though it’s not intentional on their part.
The only way Netflix can stop that is by blocking any IP address that comes from an unblocking tool. It uses sophisticated technology to check for discrepancies in a user’s connection, such as with the DNS server location.
If it finds anything to suggest that the user is utilizing an unblocking tool, it blocks the IP address and adds it to its database for future checks. That’s why you’ll sometimes come across an IP address that’s already been blocked, but it’s also why a reliable VPN that updates its IP addresses is needed.
Does Netflix Block NordVPN?
No, Netflix doesn’t specifically block NordVPN, it doesn’t target any specific VPN service. Sure, some VPNs can’t unblock Netflix at all, but there are two reasons for that: they leak information that shows you’re using a VPN, or they don’t update their servers or IP addresses so they’ve all already been “caught” in Netflix’s net.
You won’t have that issue with NordVPN because it constantly sets up new IP addresses for its servers that aren’t known to Netflix.
Final Thoughts: Streaming Netflix With NordVPN
If you’re using NordVPN but Netflix is not working, there are ways to get around it before you tear your hair out. The simplest way is to switch to a different NordVPN server and try again.
That usually works, but if not, you may need to clear your cache or check that you don’t have any DNS, IPv6 or WebRTC leaks. Check out the full VPN troubleshooting guide for more quick fixes.
NordVPN is a great VPN for accessing Netflix, as well as many other streaming services, and it comes with a 30-day money-back guarantee. Do you use NordVPN to stream Netflix? Have you had issues with NordVPN not working? Leave a comment about your NordVPN-Netflix experience. Thank you for reading.

Leave a Reply