
How to Use a VPN on iPhone: Easy Steps for 2026

Quick Summary: How to Use a VPN on iPhone
It’s easy! Just download a VPN from the App Store, create an account on the app or website, then open the app and connect to a server. Once connected, browse the internet as normal.
Best VPN for iPhone
If you use an iPhone to get online without proper precautions, you’re vulnerable to all the same privacy risks as on any other device: your internet service provider (ISP) logging and selling your data, hackers lying in wait on public WiFi, and government firewalls blocking certain sites. To start fighting back, it’s time to learn how to use a VPN on iPhone devices.
Picking a VPN and using it every day is the best way to start clawing back your online privacy, especially if you go with one of the best VPN services. Downloading and activating a VPN on your iPhone is easy, and even better, it’s likely to be cheap. I’ll walk you through the whole process and even help you choose the right iPhone VPN for your particular needs.
What Is a VPN Service?
A virtual private network (VPN) is a tool you can use to limit the amount of information you reveal online. Connecting to a VPN server encrypts all the internet data passing through your iPhone so nobody can see the sites you visit.
Additionally, while connected to a server, you’ll use that server’s IP address instead of your own. That’s useful for hiding your identity, and as an added bonus, you can pretend you’re in another country to unblock foreign websites.
You can set up a VPN manually, but using a VPN client — in this case, the VPN’s native iOS app — gives you a better interface with more options. For this article, I’ll assume you’re planning to use an iPhone VPN app. If you’d prefer to set one up manually, see our PrivacyJournal guide on how to set up a VPN.
Do I Need a VPN on iPhone?
Yes. You can check out my Why Use A VPN guide for more details, but basically, not using a VPN puts your browsing history, your IP address and your real-world location up for auction. For convenience’s sake, you also need a VPN if you want to use services in your home country while traveling, or unblock Netflix to check out worldwide streaming content.
How To: Use VPN on iPhone
Regardless of my feelings about Apple’s data collection practices, I can grudgingly concede that Apple tends to make digital tasks easy, including using a VPN. If you’ve ever downloaded an app, you already know most of what I’m about to tell you. Still, any technical task can throw up roadblocks, so I’ll take you through the process using NordVPN as an example.
Step by Step: How to Get a VPN on iPhone
I’ve used screenshots from NordVPN to illustrate each step below.
1. Download an App From the App Store
Start by picking out a VPN and making sure it has an iOS app (most of them do). Go to the App Store and type in the VPN’s name. When it appears, click the download button.

2. Create an Account
Once the download finishes, leave the App Store and tap the icon for your new VPN. Either create an account directly through the app or make one on the VPN’s website. Follow the instructions to sign in — you may have to enter your Apple ID to process the payment, then your device passcode to install the VPN configurations.

3. Connect to a Server
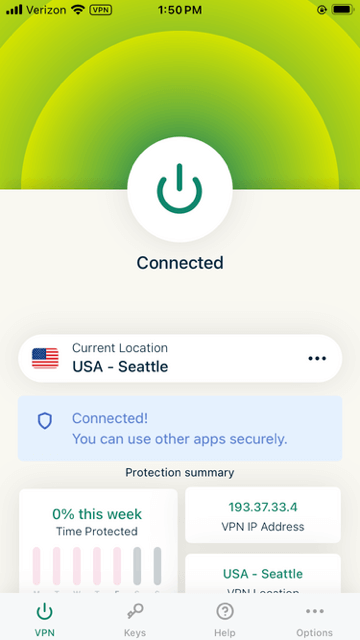
Back in the VPN app, choose a server location from the list to connect to that spot, or just click the connect button to automatically connect to the fastest server.

Once you’re connected, go to whichever browser you usually use to access the internet from your iPhone (probably Safari, but any browser will work). Get online and start browsing. It’s that simple — the VPN works in the background to keep you safe.
How to Set Up a VPN on iPhone
Using a VPN on iPhone is as easy as connecting to a server and getting online. However, if you’ve used one for a while and have gotten to know it well, there are a few settings you can manually configure to your liking. I’ll use ExpressVPN in these steps.
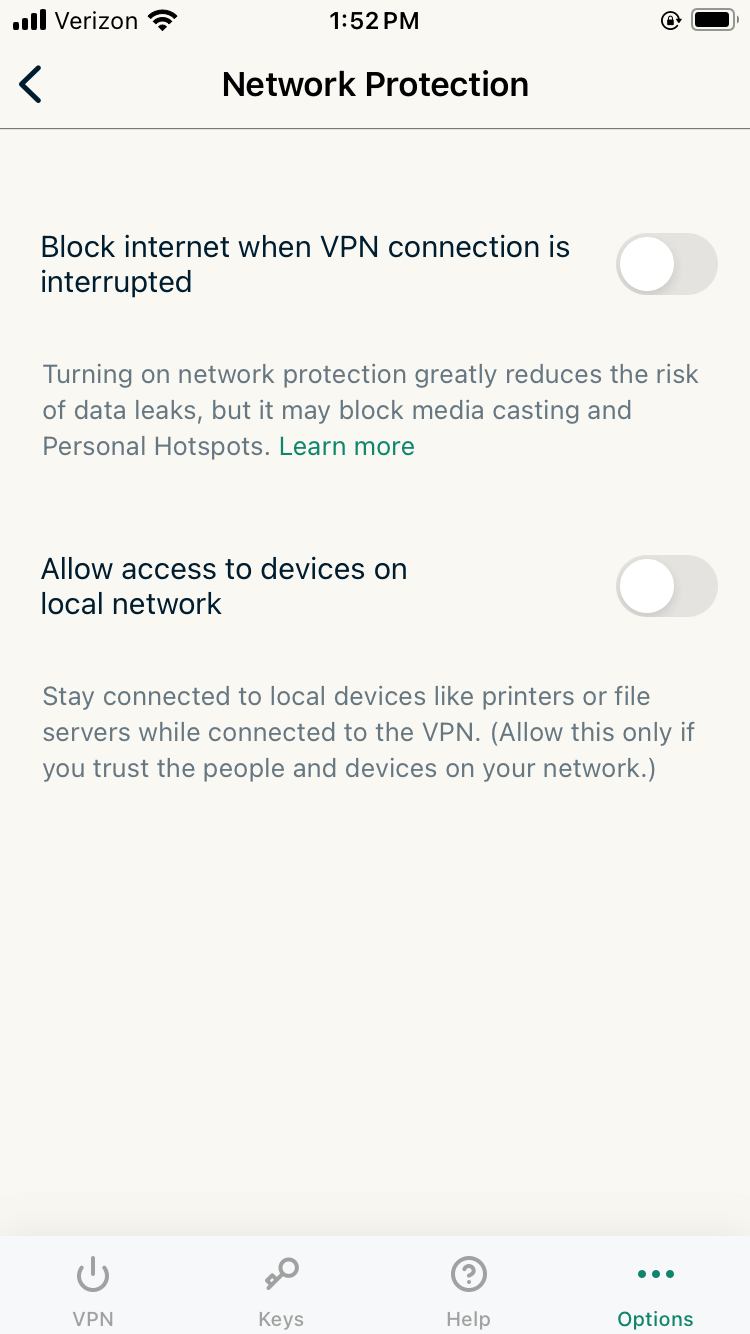
1. Activate the VPN Kill Switch
ExpressVPN’s kill switch prevents you from accidentally broadcasting information on an unencrypted connection. If you’re doing anything particularly sensitive, head into the settings and turn on the “network protection” feature.
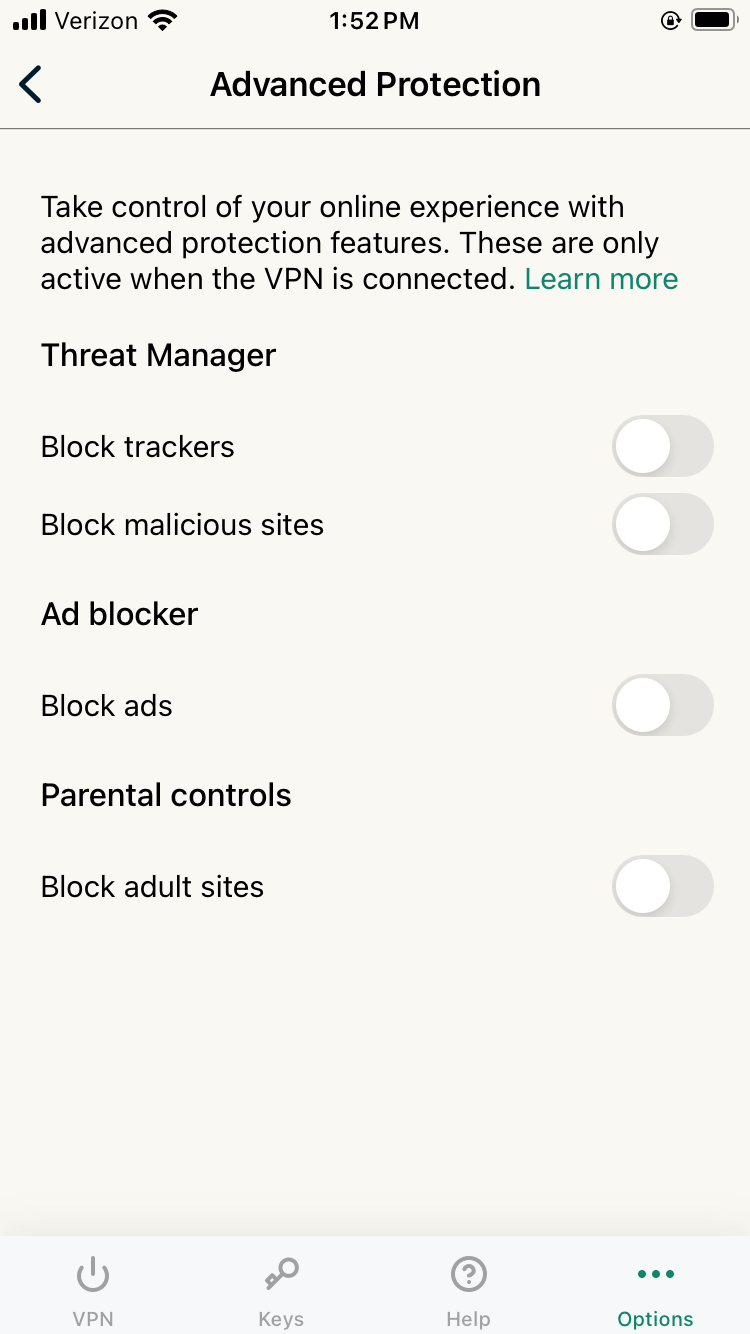
2. Toggle Malware and Ad Blockers
Most of the best VPNs now come with tools that tackle malware, ads, trackers and other privacy invasions. Check the VPN settings to see what your VPN can block, and keep them toggled on unless you have a good reason not to.
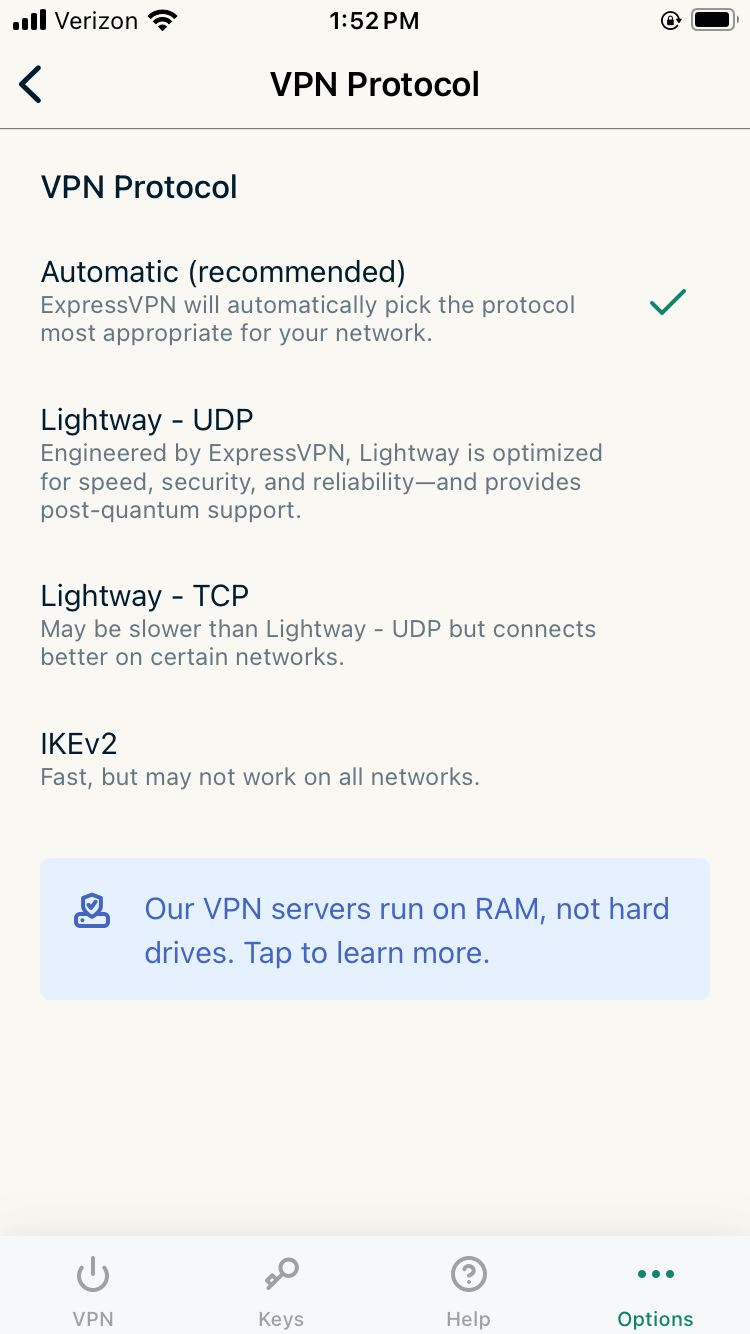
3. Choose a VPN Protocol
A VPN will often let you choose one of several protocols, each with distinct advantages. On ExpressVPN, I tend to use Lightway, which offers the best average speeds. However, if you’re finding the connection unstable, it can help to switch to IKEv2. Unfortunately, ExpressVPN doesn’t support OpenVPN on iPhone, but other VPN providers might.
4. Look for Related Apps
Sometimes, a VPN is part of a suite of security products that offer more protection than the VPN can by itself. These related apps can cost more but are sometimes free with a VPN subscription. For example, ExpressVPN Keys is a top-tier password manager that comes free with every ExpressVPN subscription. You can learn more in our ExpressVPN Keys review.

How to Use a VPN on iPhone: iPhone VPN Settings Explained
A VPN kill switch is a failsafe in case your VPN connection unexpectedly drops while you’re online. If that happens, the kill switch cuts off your internet immediately. Stronger kill switches prevent you from getting online at all unless you activate the VPN first. See our VPN kill switch guide for more information.
Malware and ad blockers aren’t part of a VPN’s core functionality, but they’re a natural extension of the services VPNs provide. They generally keep a list of URLs associated with malware, adware or unwanted trackers and block your browser from loading any of those domains. However, for full protection, you’ll want an antivirus app.
A VPN protocol is the shared language a VPN uses to communicate between devices. Most of the time, I find it’s easiest to just let the VPN choose its own protocol automatically, but there are subtle differences — WireGuard and IKEv2 speed up connections, while OpenVPN has the fewest connection drops.
How I Picked the Best VPN for iPhone
I’ve used a lot of VPNs on a lot of devices and have learned a thing or two about which iPhone VPNs won’t make you tear your hair out. Here’s the list I check every option against before buying.
- iPhone apps: My first step is to check whether the VPN provider even has iOS apps. Most of them do, but it’s not a given. I also make sure each service’s iPhone VPN apps offer most or all of the same functions as the desktop and Android apps.
- Mobile-friendly protocols: The best mobile protocols are WireGuard and IKEv2. These two offer the fastest speeds, which lets you switch your phone between data and WiFi networks without losing your connection.
- Speeds: I always use speedtest.net to check how fast the VPN runs, especially when connected to servers in other countries. Fast speeds are crucial if you plan to use the VPN to stream video.
- Mobile interface: Designing a friendly mobile interface is trickier than it looks. An iPhone VPN should be intuitive to use without too much clutter.
The Best iPhone VPN Apps
If you’re looking to use a VPN on an iPhone, these are three premium providers I can suggest wholeheartedly, based on the above requirements. If you’re on a major budget and are interested only in free VPNs, check out my guide on free VPNs to see which ones are good on Apple devices.
1. NordVPN — Fastest iPhone VPN App

- Meshnet for mobile & home devices
- Fastest average speeds
- Multihop servers
- iOS interface can be troublesome
NordVPN doesn’t feel quite as seamless on iOS as ExpressVPN does, since it’s built around a drag-and-drop map interface that isn’t always convenient on a small screen. But that’s the only complaint I can think of, and I love complaining. NordVPN is slightly faster than ExpressVPN, which can make a difference when you’re gaming or streaming.
The other reason to pick NordVPN is its wealth of features. Double-hop connections eliminate the danger of one server going down, and Threat Protection deftly blocks ads and trackers. You can also use Meshnet to create a secure connection between your phone and your home or office device so you can access the latter remotely.
You can also try NordVPN using the 30-day refund period on all plans, including the monthly option.
- $4.13 best price
2. Surfshark — Affordable Security Suite for iPhones
Take advantage of Surfshark‘s significant price reduction and try it risk-free for 30 days.
- Inexpensive VPN security suite
- Unlimited devices per subscription
- Great for unblocking streaming sites
- No split tunneling on iOS
I know being on the Apple side of the tech world is expensive, so I wanted to draw attention to a high-performing VPN you can get for less than $2.50 per month. Surfshark also places no restrictions on the number of simultaneous connections,so you’ll save even more if you can get a large group of users together.
I don’t mean to make Surfshark sound like the Spirit Airlines of VPNs, though. Its iOS app connects fast, runs fast and unblocked every streaming app I tested on the first try. The only flaw is that the iPhone version doesn’t allow split tunneling.
Surfshark is a VPN company shifting its service to be more of a security suite than only a VPN. You can try any of Surfshark’s plans with the 30-day money-back guarantee.
- $2.21 best price
3. ExpressVPN — Easiest to Use iPhone VPN
Opt for ExpressVPN’s two-year subscription to enjoy considerable savings plus three complimentary months.
- Clean, responsive interface
- Impeccable security record
- Consistently fast speeds
- OpenVPN protocol not available
- No split tunneling on iOS
Using ExpressVPN feels like driving a luxury car. From the start, you can tell that somebody thought hard about the placement of every button and feature. When connected, it hums along in the background, making barely a dent in your internet speeds. It’s also never had a serious security breach and keeps all user information on RAM servers, where it’s erased regularly.
The only downsides are the lack of OpenVPN (my favorite protocol for its time-tested, open-source bonafides) and split tunneling (instead, the VPN encrypts everything or nothing; there’s no in-between). However, I never notice this 99% of the time I spend using ExpressVPN. You can learn more about the ins and outs in my ExpressVPN review.
You can try ExpressVPN using its 30-day money-back guarantee on all plans, including the monthly option.
- $6.66 best price
Conclusion: VPN Setup on iPhone Is Simple
Even if you just learned today what “VPN” stands for, you shouldn’t have any trouble setting up your iPhone VPN. The process is designed so that each step leads naturally into the next. Just download a VPN, open it, create an account, connect and get online.
Test NordVPN’s capabilities with a month-long return option, and secure long-term plans at reduced prices.
Now that I’ve walked you through setting up an iPhone VPN, how was your experience? Did I miss any important steps? Do you have a favorite VPN service? I’d love to chat about it in the comments. Thanks for reading!
FAQ: iPhone VPN Configuration Guide
What Is a VPN on iPhone?
“VPN” stands for “virtual private network.” Using a VPN on your iPhone is a safety measure — with sophisticated encryption algorithms, it prevents hackers, advertisers and governments from spying on your online activities.
Leave a Reply