How to Set Up VPN on Mac Devices: Manually vs a VPN App in 2025
Quick Summary: How to Set Up a VPN on Mac
It’s possible to set up a VPN on Mac via a VPN app or by manually configuring it through the system settings. In terms of apps, NordVPN is the best VPN for Mac, offering fast speeds and solid security.
Subscribe and try NordVPN with a 30-day money-back guarantee.
You can set up VPN on Mac computers to protect your online traffic from surveillance, make yourself anonymous and access geo-restricted content. The setup process is easy with a VPN app, especially if you pick one of the best VPNs such as NordVPN or ExpressVPN. Manual setup is a little harder, but it has its uses.
There are two ways to set up a VPN on a Mac. You can download and install a VPN app or configure one through the macOS system settings. Note that a VPN created through the system settings isn’t a functional VPN itself — you must know the identity of an actual VPN server in order to connect, which typically involves getting a VPN subscription.
In this article, I’ll provide complete step-by-step guides for installing a VPN app and manually setting up a VPN on a Mac computer. I’ll also break down some of the best VPNs for Mac so you can choose the right one.
- Money-Back Guarantee30 DaysWorldwide Server AmountOver 5,400+ servers in 59 countries
Does a Mac Have a Built-In VPN?
No, Mac computers don’t have built-in VPNs. However, you can manually configure a VPN connection on a Mac through the network settings. To do this, you’ll still need an actual VPN service to give you the necessary details, including a server address and the authentication settings for an account.
You may wonder why you’d manually set up a VPN on Mac if you must still subscribe to a VPN service. Manual VPN configurations are vital if your Mac runs on an outdated macOS version that doesn’t support VPN apps. For instance, ExpressVPN won’t work on macOS versions that precede OS X El Capitan 10.11.
That being said, a manually configured VPN is less efficient than an actual VPN app. For example, it lacks a kill switch, so your information will be vulnerable if the VPN connection drops. Manual configuration is also complicated unless you’re an advanced, tech-savvy Mac user.
Generally, picking one of the best VPNs for macOS will be your best option. If you’re wondering about the overall benefits, learn why it’s important to use a VPN.
Step by Step: How to Set Up a VPN on Mac
There are two main ways to set up a VPN on macOS. You can download and install a VPN app or manually configure a VPN in the settings. I’ll cover the latter method first since it’s more complex.
Manual Setup: VPN on Mac
Here are the steps for manually setting up a VPN on your Mac.
1. Open the System Settings
On your Mac, navigate to the top-left corner, click on the “Apple” menu and choose “system settings.”

2. Open the Network Settings
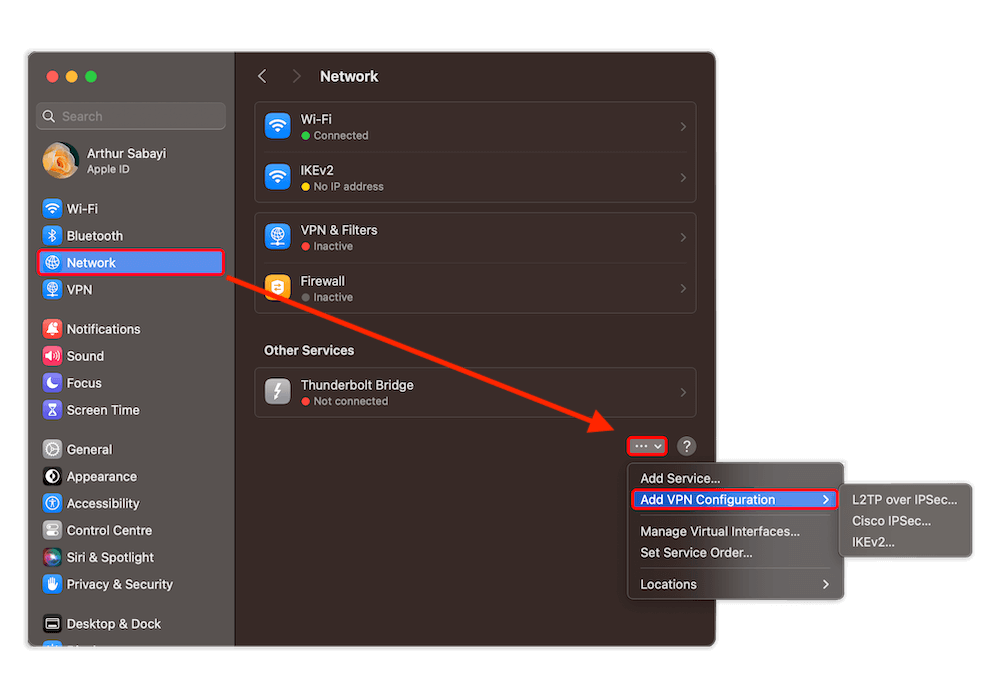
In the new tab that opens, scroll and locate “network.” Click on the action pop-up menu near the bottom-right side and choose “add VPN configuration.” You’ll see three options: L2TP over IPsec, Cisco IPsec and IKEv2. L2TP over IPsec has the most options, but I chose IKEv2 as it offers better speeds and security.
3. Enter the Necessary Details
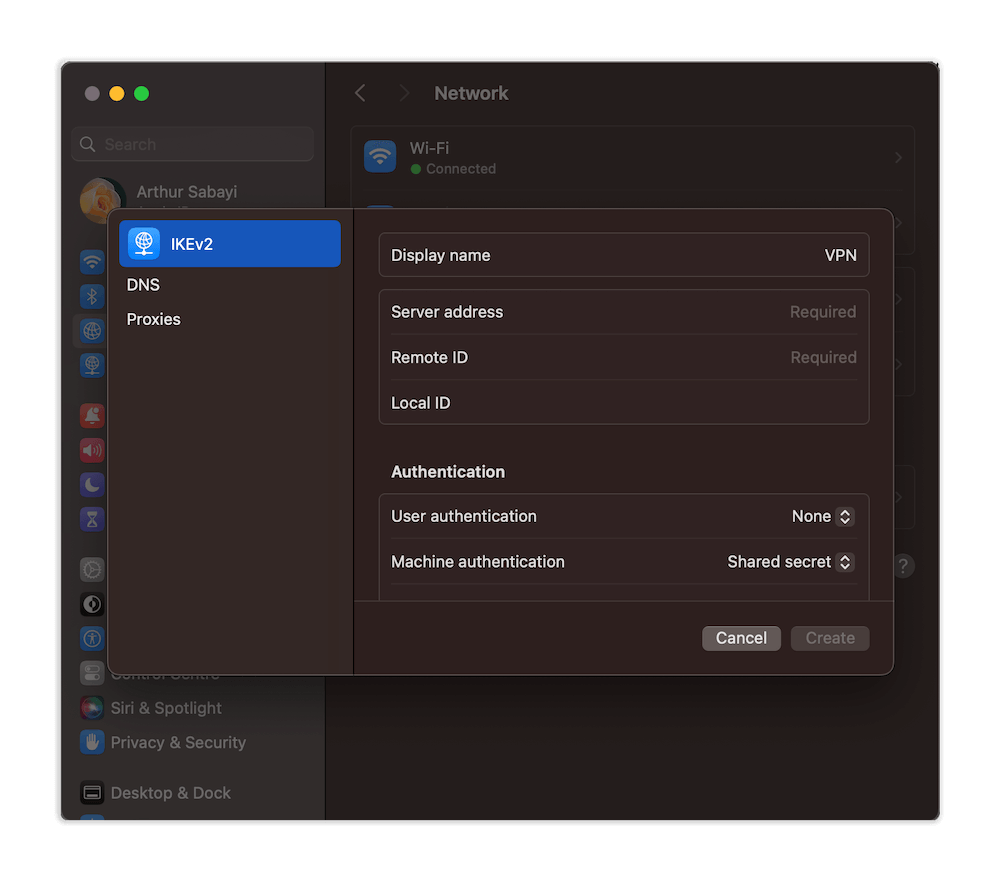
Start by naming your VPN connection in the “display name” tab. You’ll also need to enter the server address and the remote ID, along with your user credentials for the VPN provider that manages the server. After providing all these details, click “create” to finish the setup process.
4. Connect the VPN
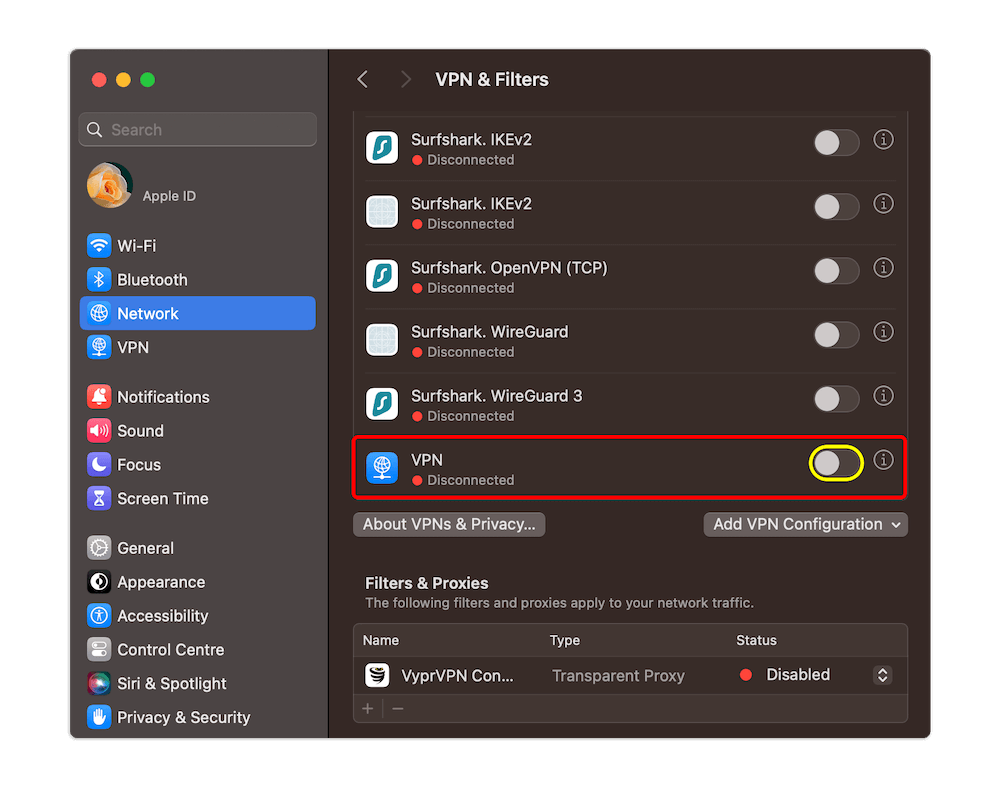
If the details you entered are correct, you should now be able to connect the VPN directly from your system settings. To disconnect the VPN, simply toggle the “connect” button off.
Set Up Using a VPN App on a Mac
A standard VPN app is easier to set up and use on your Mac. The following are the required steps.
1. Subscribe to a VPN
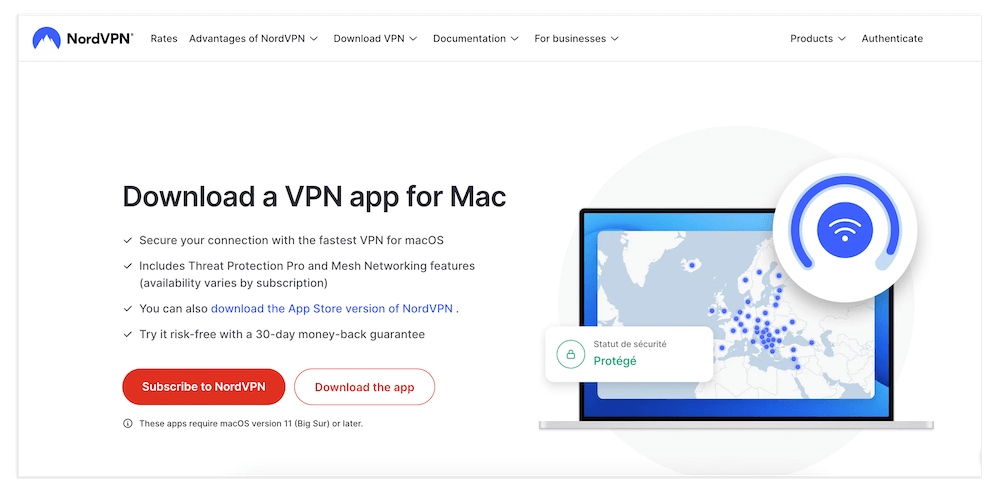
Purchase a subscription to your preferred VPN service that fits your budget. For demonstration purposes, I’m using NordVPN, arguably the best VPN for Mac. Open the download page, download the VPN app compatible with macOS and install it.
2. Check the VPN Settings
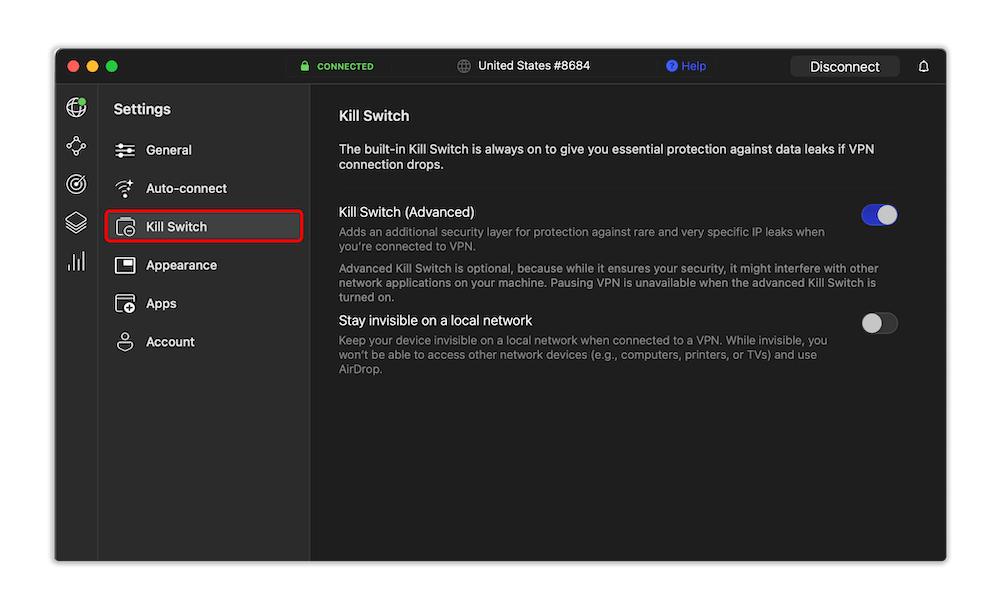
In the app settings, confirm whether important features, like the kill switch, are activated. You can also select a different protocol depending on your needs, or you can let the VPN choose for you.
3. Connect to a Server
Open the VPN server list, choose your desired server location and click the “connect” button. Now the virtual private network will hide your activity from your internet service provider, and you can access geo-restricted content in the region of your chosen VPN server.

How to Turn Off a VPN on Mac
You can turn off the VPN on Mac by disconnecting it (if you’re using an app) or switching it off in the system settings.
Turn Off the VPN App
- Maximize the VPN app interface if it’s minimized in the dock.
- Find the big green circle with the power button that shows “connected” in the center.
- Click it once to turn off the VPN.
Turn Off Manual VPN via Settings
- Open the system settings by clicking the “Apple” icon near the top-left corner of your screen.
- Click the “VPN” tab on the sidebar. You may need to scroll down if you don’t see it immediately.
- Toggle the button next to the active VPN on the far right to disconnect the VPN.
Picking the Best VPN for Mac
Not all VPNs are ideal for macOS. Look for certain features and capabilities when choosing a provider for your Mac device. Here’s a quick rundown of what to keep in mind.
- macOS compatibility: The ideal Mac VPN must work with as many macOS versions as possible. If it’s not compatible with the version you’re using, you’ll have to set up a manual connection instead.
- Ease of use: If protecting your online browsing and getting Netflix unblocked is all that you need, then find a VPN that’s easy to install and use. You should be able to quickly access features like the kill switch and change protocols when necessary.
- Reliable security and privacy: One of the most important functions of a Mac VPN is to protect your device from snooping and external threats. At a minimum, the ideal secure VPN should provide encryption and IP leak protection — see our “are VPNs safe?” guide to learn more.
- Large server network: The more server locations, the merrier. That way, you get more options for unblocking restricted content without worrying about speed bottlenecks from server crowding.
- Affordability: Finally, the VPN should be within your budget while providing all the necessary features. Money-back guarantees and free trials are other bonus features you should consider.
Now that I’ve outlined all the important factors, I’ll help you pick the best VPN for a Mac computer. You can also use these standards for other devices, like when you’re picking the best VPN for Apple TV.
The Best VPNs for Mac
There are many VPNs that are compatible with Mac and you have to pay attention to the above factors to find the right VPN. Here are the best VPNs for Mac.
NordVPN — Best VPN for MacOS

Take advantage of NordVPN’s significant price reduction and try it risk-free for 30 days.
- Fast speeds
- Dark Web Monitor
- Large server network
- Double VPN can be slow
NordVPN is one of the most secure VPNs in the industry. Its Dark Web Monitor feature that searches the dark web for your leaked credentials, notifying you immediately so you can take action to protect yourself. There’s also Double VPN, where your internet traffic is passed through two servers in a process called server chaining, giving you twice the protection.
You can also unblock geo-restricted resources like streaming services and gaming lobbies on your macOS computer through any of NordVPN’s 6,000 servers in 111 countries, including specialized servers. The NordVPN app for macOS has grouped the servers under Double VPN, Onion Over VPN, P2P and Obfuscated servers for easier access.
NordVPN is compatible with macOS 10.12 Sierra, macOS 10.13 High Sierra, macOS 10.14 Mojave, macOS 10.15 Catalina, macOS 11 Big Sur, macOS 12 Monterey, macOS 13 Venture, macOS 14 Sonoma. Read more in our NordVPN review.
- $3.99 per month
ExpressVPN — Most User-Friendly VPN for MacOS

New ExpressVPN customers can enjoy a considerable price reduction on their first two years of service.
- Secure & private
- Large server network
- User-friendly interface
- Expensive
ExpressVPN offers servers in 164 locations across 105 countries, allowing you to bypass geo-restrictions on your Mac device in different parts of the world.
It’s also one of the fastest VPNs thanks to the Lightway UDP VPN protocol, which offers amazing speeds for streaming and gaming. For security, it uses the industry standard AES-256 encryption that protects your internet traffic from potential interceptions. ExpressVPN doesn’t store user logs either, as evidenced by its diskless servers that delete all activity automatically.
ExpressVPN is compatible with OS X EI Capitan (10.11), Sierra 10.12 and High Sierra 10.13, Mojave 10.14, Catalina 10.15, Big Sur 11, Monterey 12, Ventura 13 and Sonoma 14. You can use ExpressVPN and receive consistent app updates if your Mac runs on any macOS version from 2015 to the present.
I found it very easy to install and use ExpressVPN on macOS; even first-time users can find their way around it without help. The manual setup was also a lot simpler than other VPNs I’ve tried. You can read more about this VPN service in our ExpressVPN review, and see our ExpressVPN vs NordVPN article to learn how it stacks up against the next close competition.
- $6.66 per month
Paid vs Free VPN for Mac
There are some good free VPNs — like PrivadoVPN, hide.me, TunnelBear, Proton VPN and Windscribe — that you can set up on your Mac. Reliable free VPNs are a good substitute if you’re on a very tight budget and don’t mind some downsides like limited server networks. Read our best free VPN guide for options you can trust.
However, overall, I wouldn’t recommend most free VPNs as they’re often lax on security and privacy — some even exploit you directly. While reliable options like NordVPN cost money, they have many upsides. You get amazing speeds, reliable security and access to a large server network.
Conclusion
You can set up a VPN on a Mac computer in two ways: using a VPN app or manually setting it up in the macOS system settings. The manual setup process is a little more complicated than the VPN app option, so it may appeal mostly to advanced users.
NordVPNis the best VPN for Mac. It has a large server network, reliable privacy and excellent security. The service is also compatible with multiple macOS versions, including OS X EI Capitan (10.11), which was released in 2015.
Of the two setup options, which one appeals to you most? Have you ever manually configured a VPN on your Mac? How was your user experience compared to a normal VPN app? Tell us about it, and keep reading our blog for more informative posts.
FAQ: Set Up a VPN Connection on a Mac
How Do I Set Up a VPN on My Mac?
You can set up a VPN on your Mac by creating one through the system settings. Alternatively, you can subscribe to a VPN service, and then download and install the VPN app.Does Mac Have a Built-In VPN?
No, Macs don’t have built-in VPNs. However, you can create a VPN conduit in the system settings that will let you connect to actual third-party VPN servers.How to Get a VPN on Mac for Free?
You can get a VPN on a Mac for free by downloading and installing a free VPN service. A good option is Proton VPN, which offers free servers in five locations and reliable speeds. Proton VPN and some other free VPNs also let you download configurations for manual setup.How Do I Add OpenVPN to My Mac?
You can add OpenVPN to your Mac by downloading the OpenVPN Connect app online, installing it and configuring it to run on your macOS device.

Leave a Reply