How to Set Up a VPN on Android in 2025: VPN App Setup Guide
- Table of Contents
- Step by Step: How to Set Up a VPN on Android
- How to Set Up a VPN on Android Manually
- OpenVPN Setup on Android
- Android VPN Settings Explained
- Why Use a VPN on Your Android Device?
- How to Choose a Trusted VPN Provider for Android
- Top Android VPN Apps
- Conclusion
- FAQ: Android Virtual Private Network Setup
Quick Summary: How to Set Up a VPN on Android
You can quickly set up a VPN on Android by downloading it from the Google Play store and installing it on your device. ExpressVPN is a reliable Android VPN app that’s user-friendly and comes with a 30-day money-back guarantee.
- Purchase a VPN subscription.
- Find the VPN in the Google Play store.
- Install the VPN.
- Launch the VPN and sign in.
- Grant the VPN permissions.
- Connect to a server.
- Change servers as needed.
You can download the best VPNs from the Google Play store and install them on your Android device; the process isn’t complicated. I’ll show you how to set up a VPN on Android with detailed instructions that apply to any virtual private network compatible with Android OS.
There are multiple reasons for having a VPN on your Android device. It encrypts your online traffic to stop anyone from snooping in on you. You can also unblock geo-restricted content by connecting to servers that change your IP address to a location of your choice.
- Money-Back Guarantee30 DaysWorldwide Server AmountOver 5,400+ servers in 59 countries
Step by Step: How to Set Up a VPN on Android
I own a smartphone, tablet and TV that run on Android, and the setup process is the same for all of them. For demonstration purposes, I’ll use my Android phone and ExpressVPN because it’s the best VPN for Android. Here are the instructions you can follow.
1. Purchase a VPN Subscription
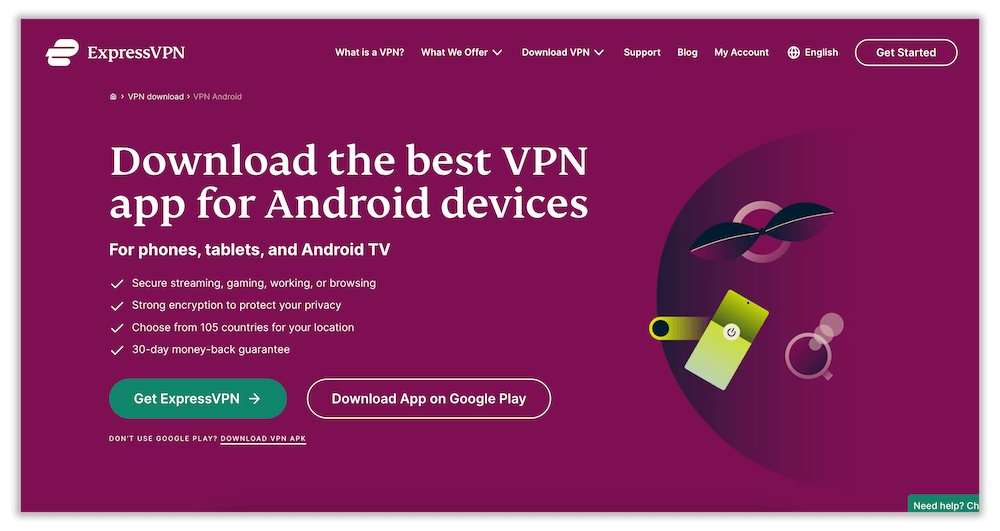
First, go to the VPN’s website and purchase a VPN subscription package that is within your price range. ExpressVPN has three price plans, and all are covered by a 30-day money-back guarantee with a full refund.
2. Find the VPN in the Google Play Store
Launch the Google Play store and type the name of your chosen VPN. Some VPNs, including ExpressVPN, have a safe and identical alternative APK you can download if you don’t use the official Google Play store.

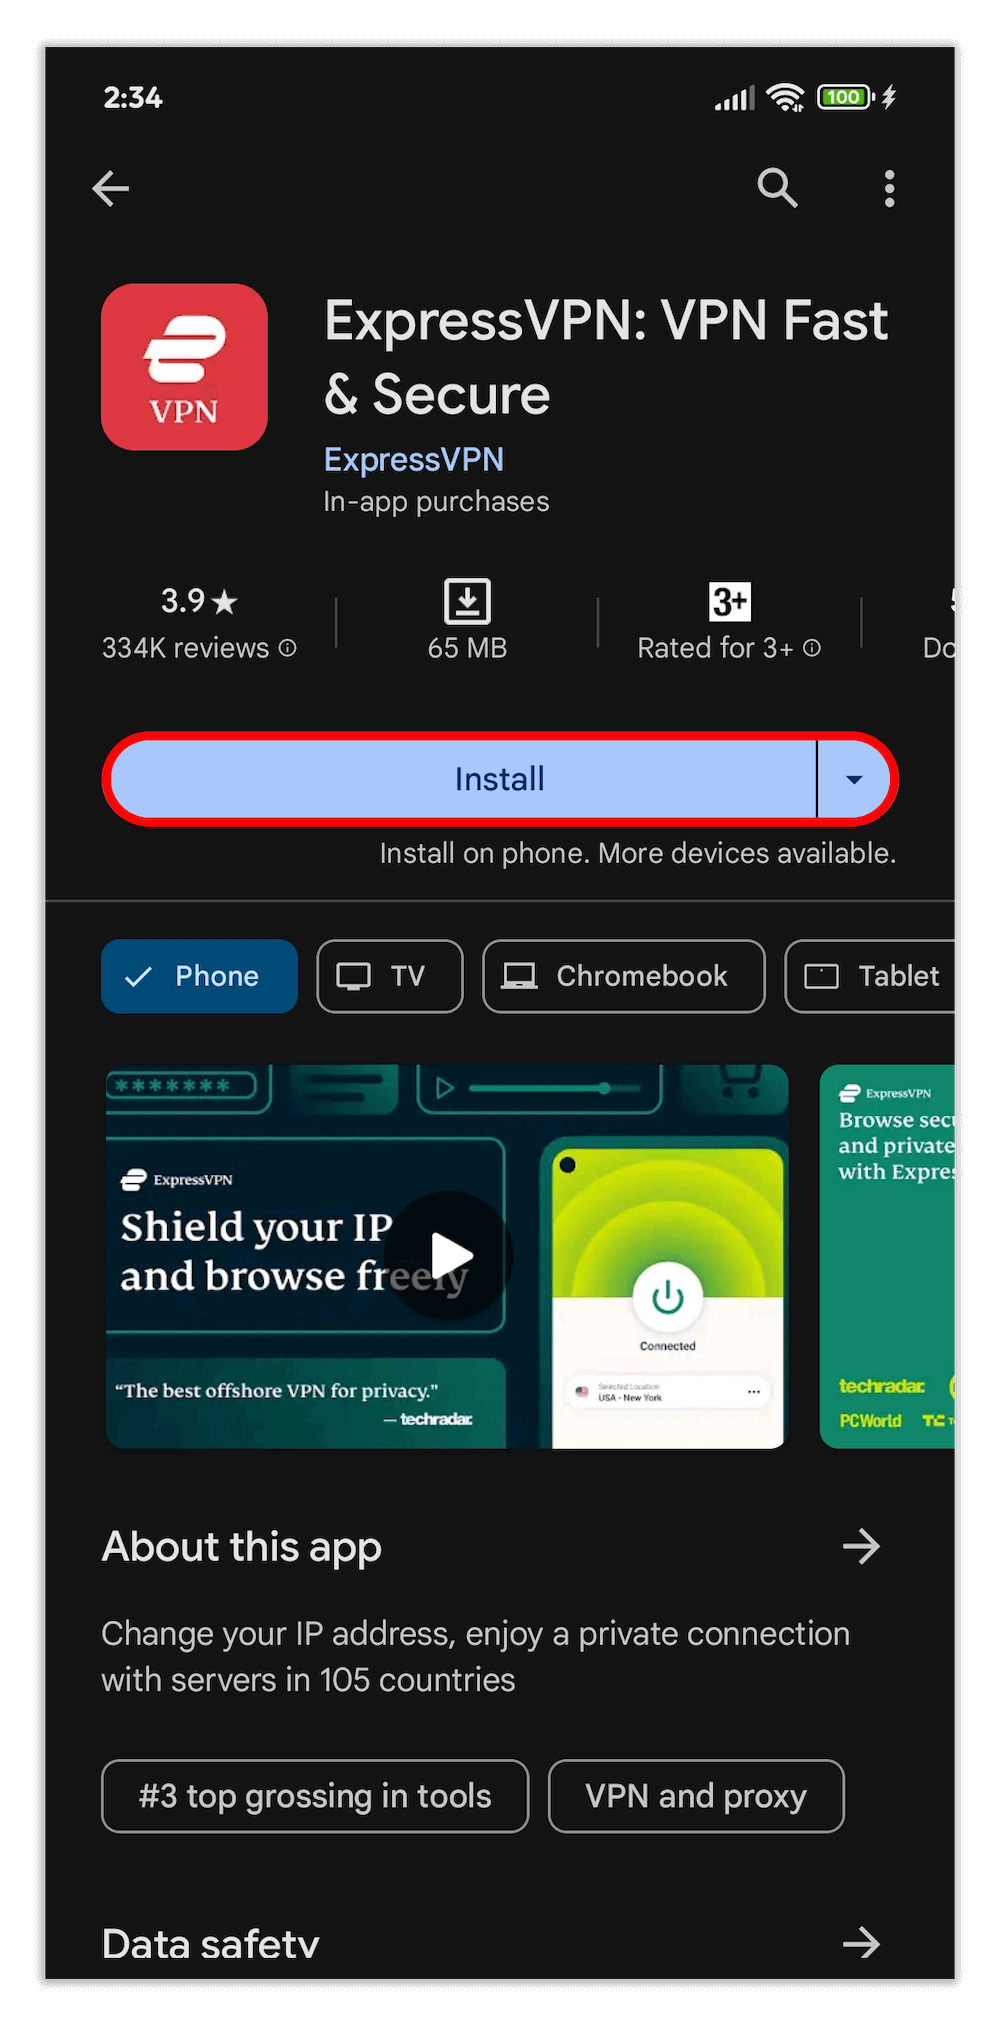
3. Install the VPN
Tap the “install” button to download and install the VPN app on your device. Wait for the download and installation processes to complete.
4. Launch the VPN and Sign In
Locate the installed VPN app on your device, launch it and sign in with the credentials you created on the provider’s website.

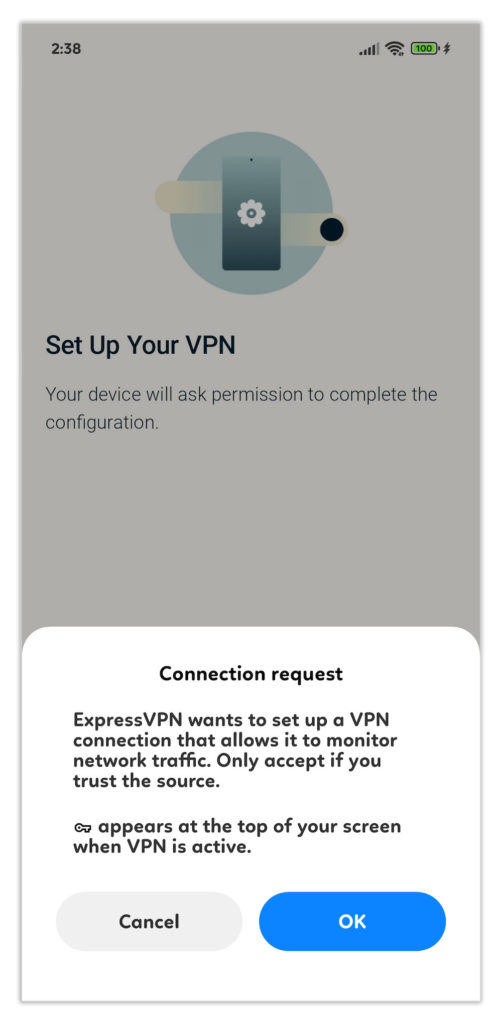
5. Grant the VPN Permissions
You will see screen prompts asking for connection permissions that allow the VPN to monitor certain elements of your network activity. Tap “OK” to confirm.
6. Connect to a Server
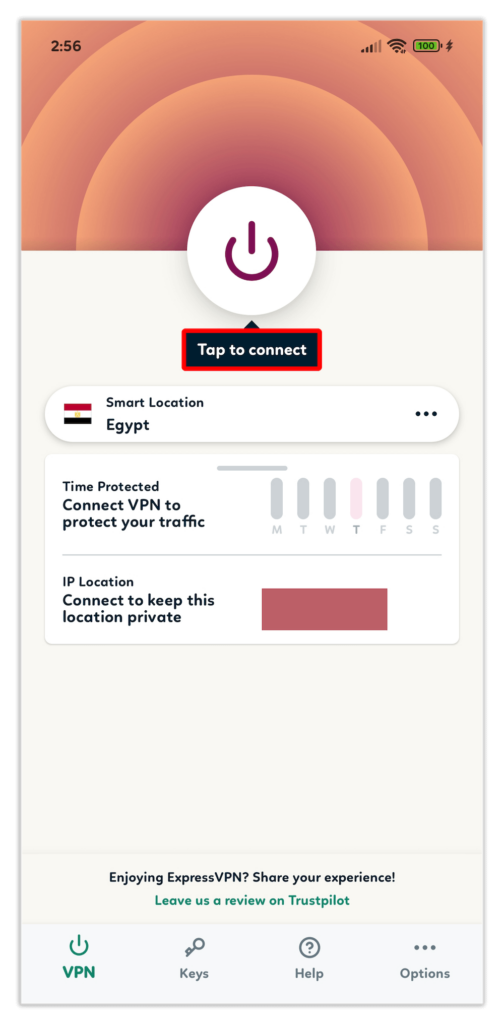
With all the basic configurations in place, touch the “tap to connect” button to quickly connect to the best VPN server available.
7. Change Servers as Needed
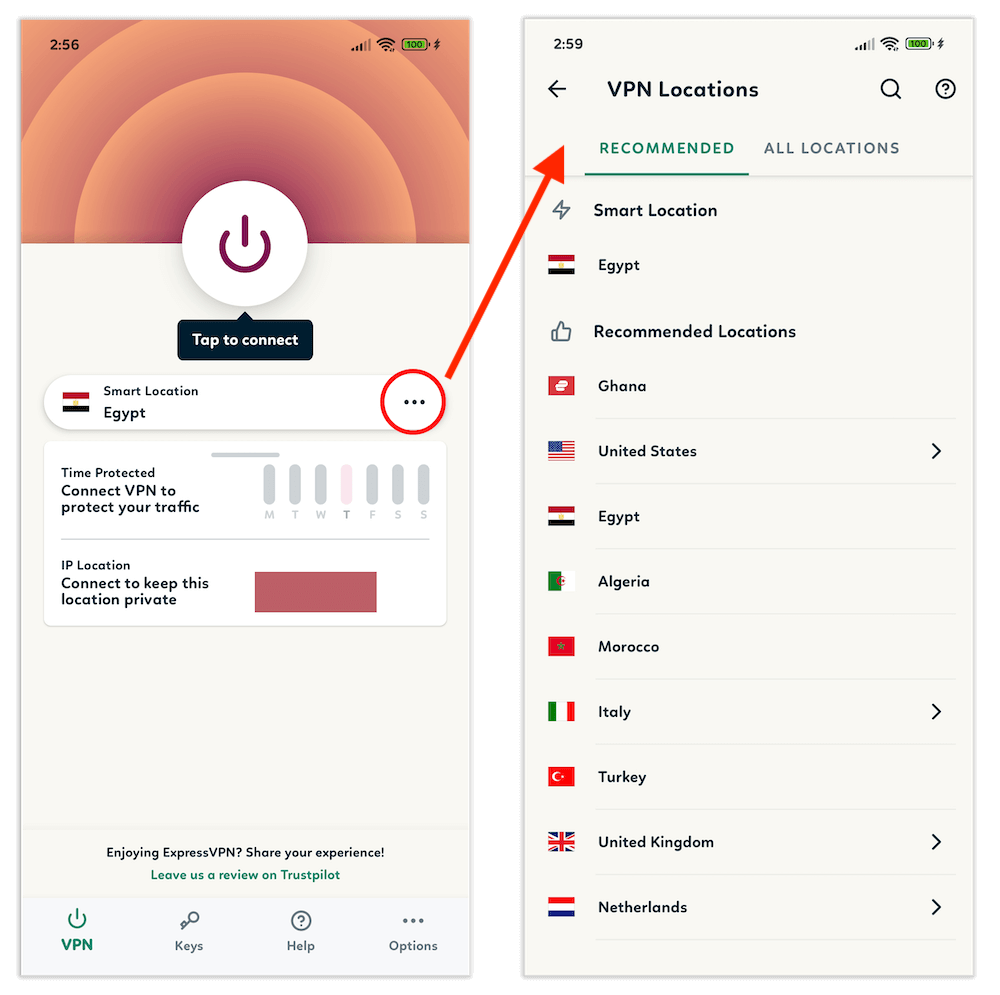
To connect to a different server, tap the three dots on the “smart location” tab to open the server address list. You can scroll through the list or use the search bar.
With that, your Android device is now encrypted, and you can access anything you want online without worrying about being snooped on or hacked.
How to Disconnect the Android VPN Service
You can disconnect your Android VPN anytime by tapping the “connection” button within the app. Alternatively, you can do this through the Android device settings using the following steps.
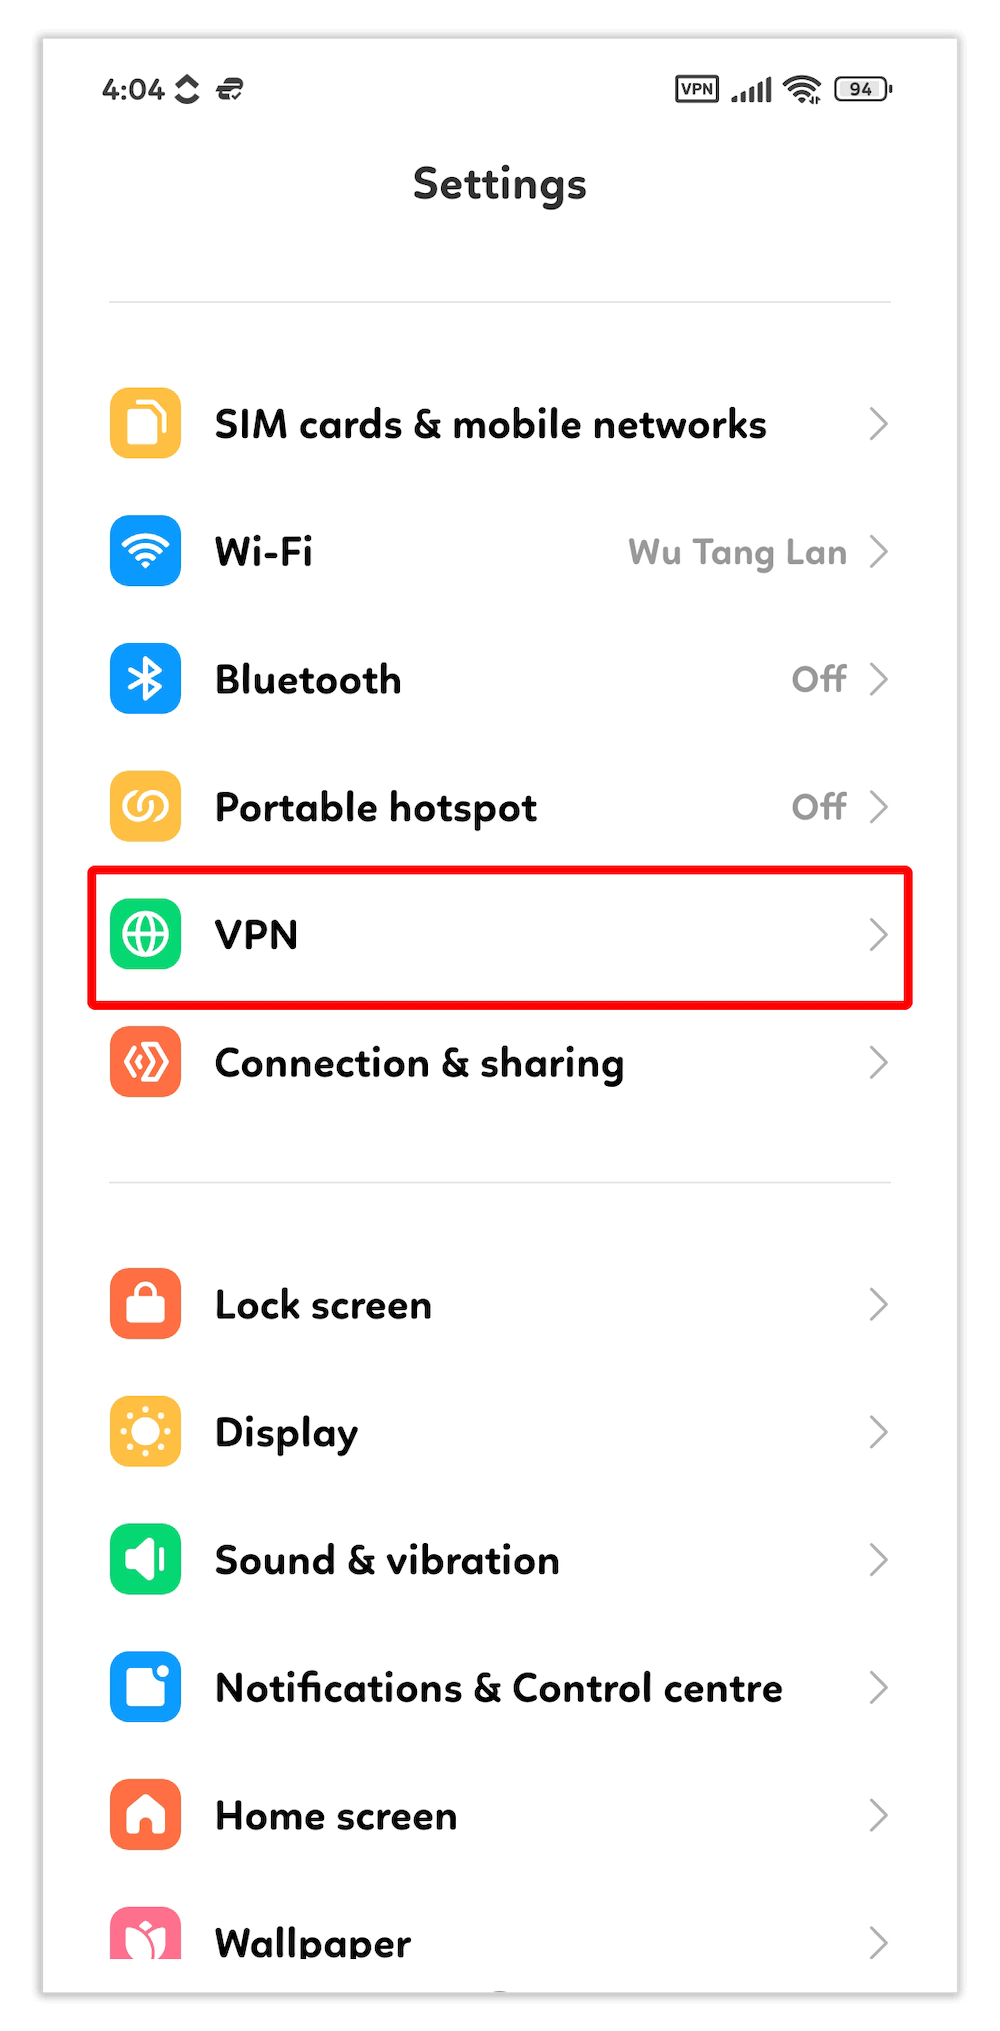
1. Open the Device Settings
Go to the general settings of your Android device.
2. Open Your VPN Connections
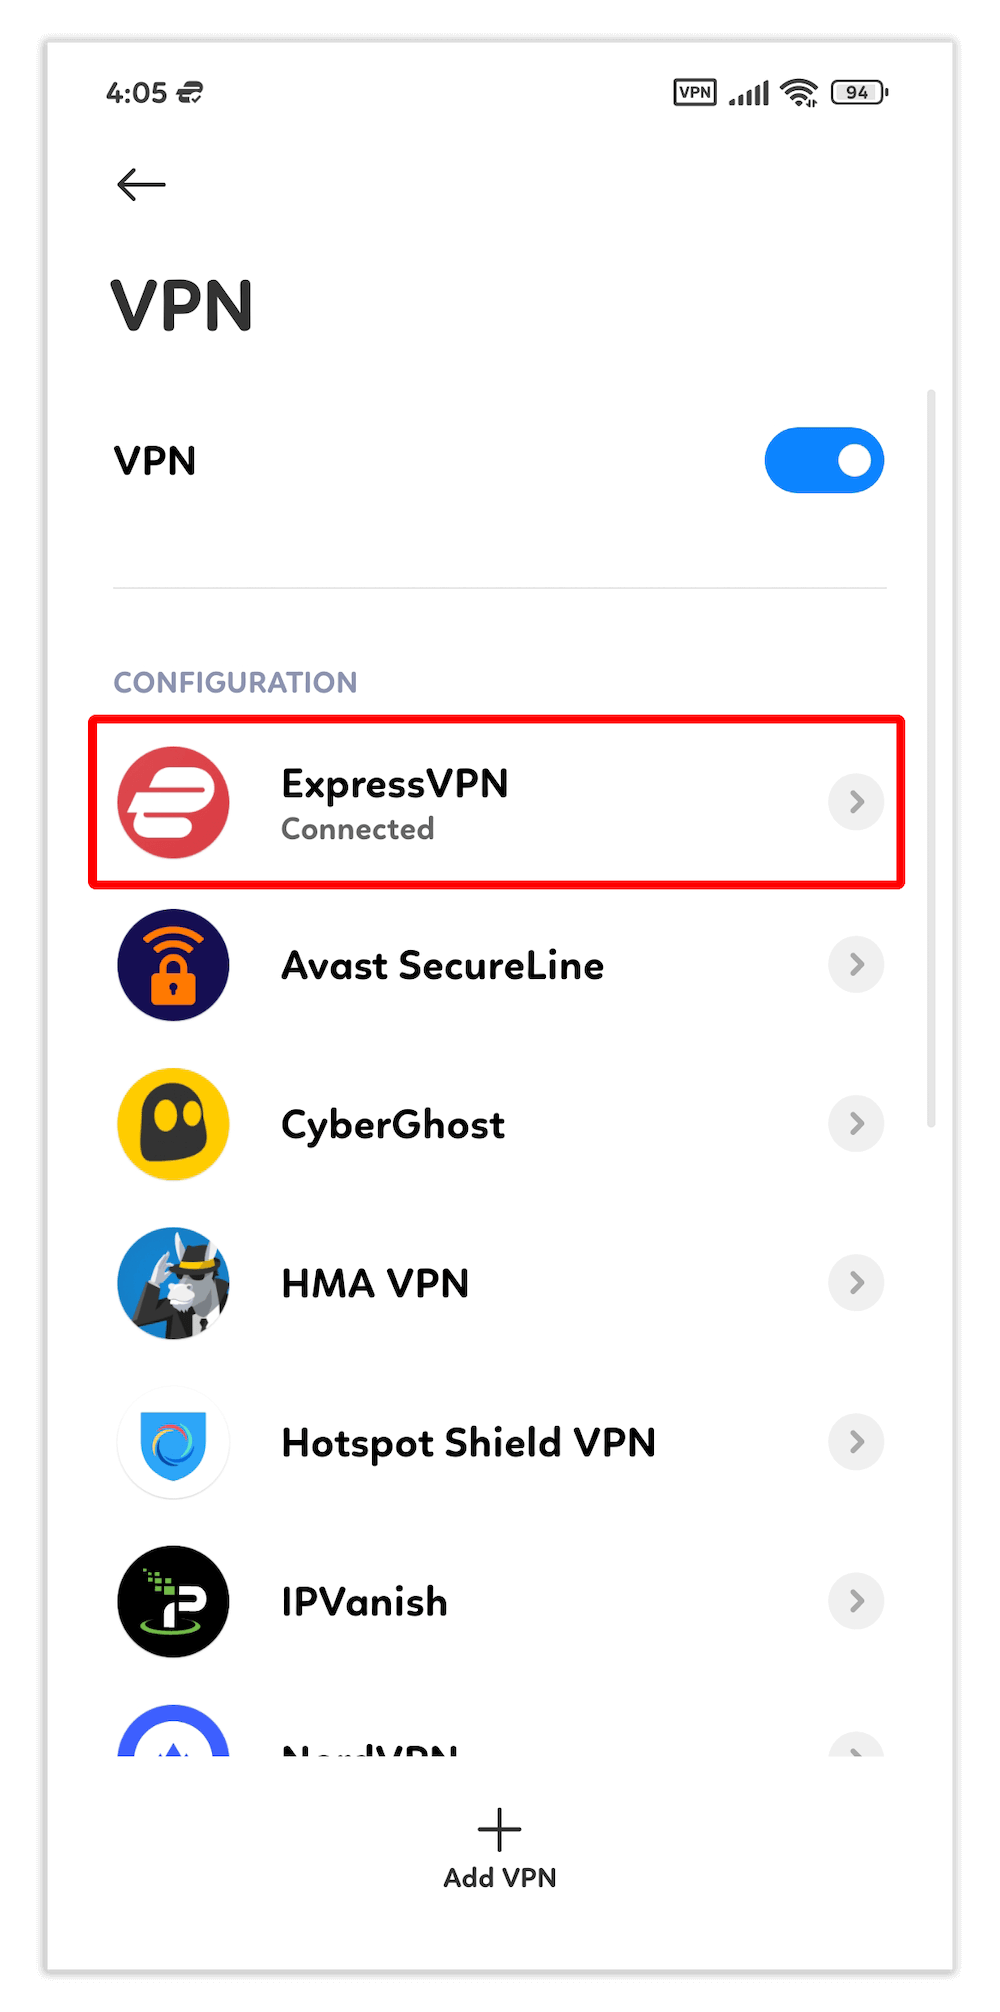
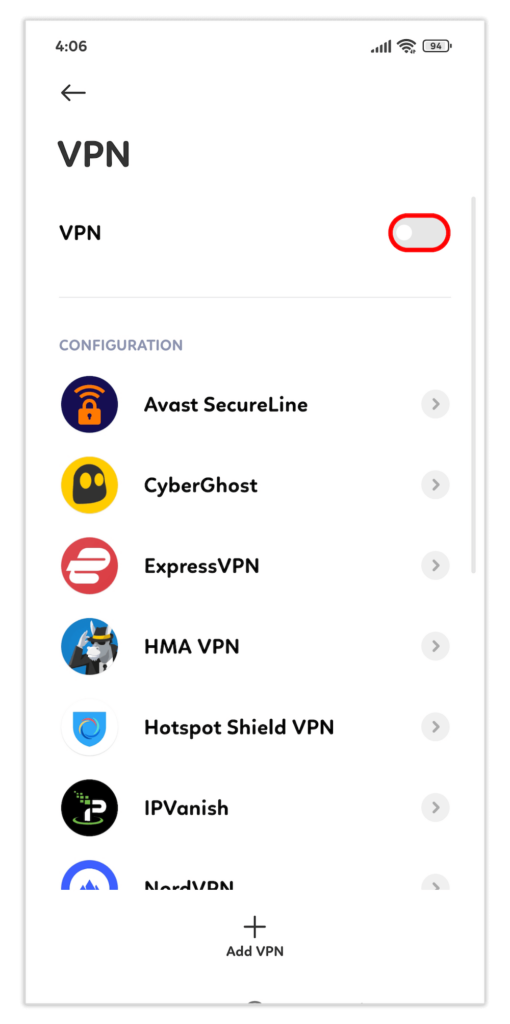
In the settings, you should be able to access your VPN connections. Some newer versions of Android have a “VPN” option in the list. Tap that to open your VPN connections.
3. Disconnect the VPN
At the top of your screen, you’ll see an “active” button next to the “VPN” toggle switch. Toggle it off to disconnect all VPN services.
How to Set Up a VPN on Android Manually
Here’s how to configure the basic default settings of your new Android VPN manually.
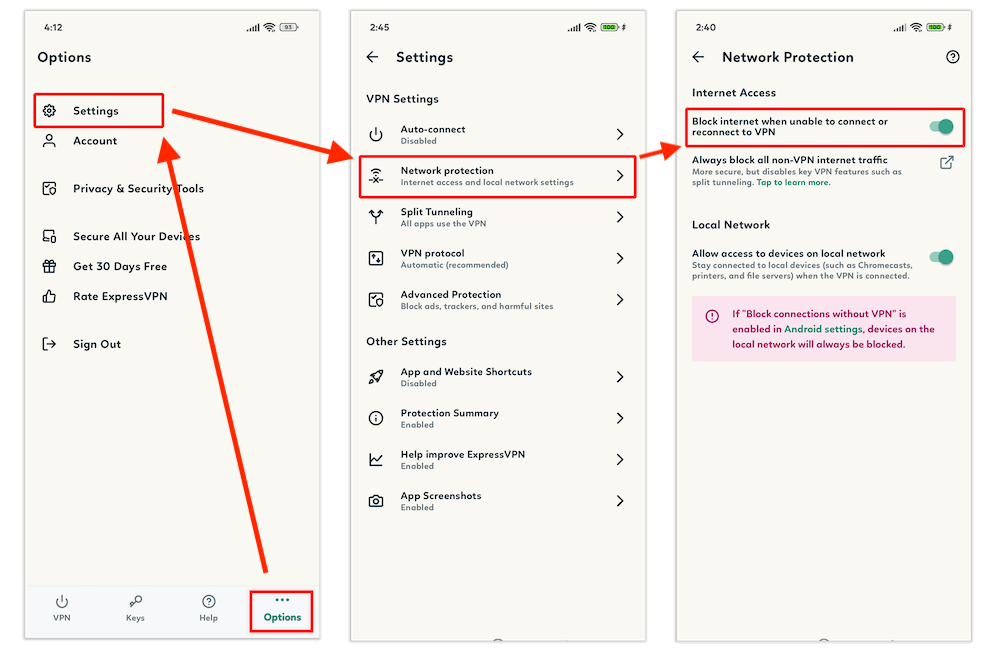
1. Activate the Kill Switch
Open the “options” menu in the bottom-right corner of your screen and select the app settings. Then tap “network protection” and toggle the button next to the “block internet when unable to connect or reconnect to VPN” option to activate the VPN kill switch. It’s usually activated by default, but always check just to be sure.
2. Select a Protocol
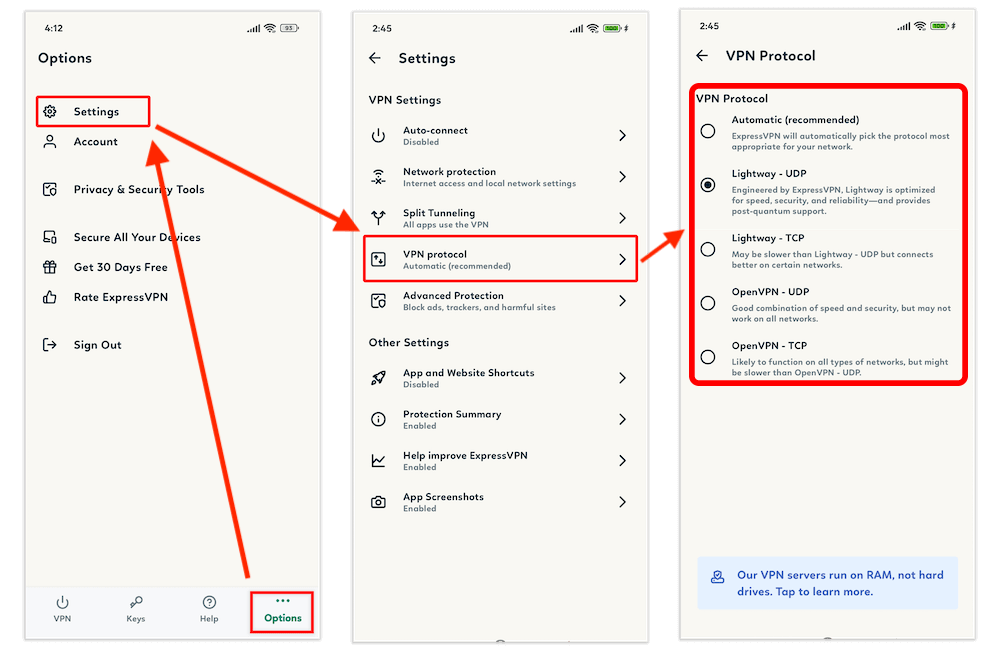
Different VPN protocols serve different functions. For instance, IKEv2 consumes less data than other protocols, while OpenVPN over TCP minimizes unexpected slowdowns. You can change them through the VPN app settings as demonstrated in the ExpressVPN example below.
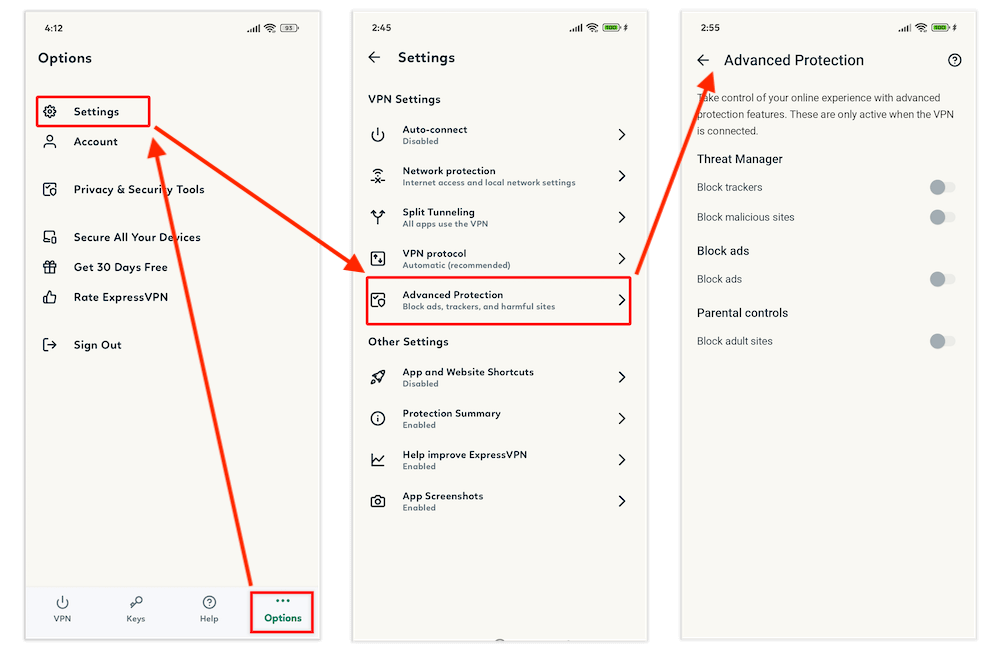
3. Activate Ad/Malware/Tracker Blockers
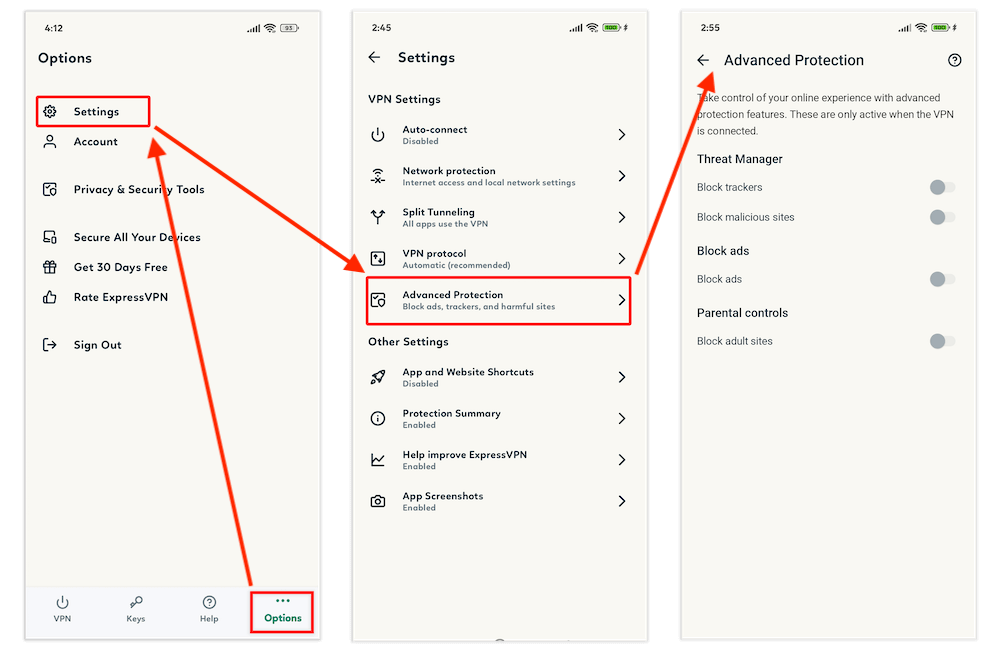
Some VPNs come with ad, malware and tracker blockers to prevent you from being stalked by advertisers or opening unsafe websites. For ExpressVPN, you can access this feature through the “advanced protection” option.
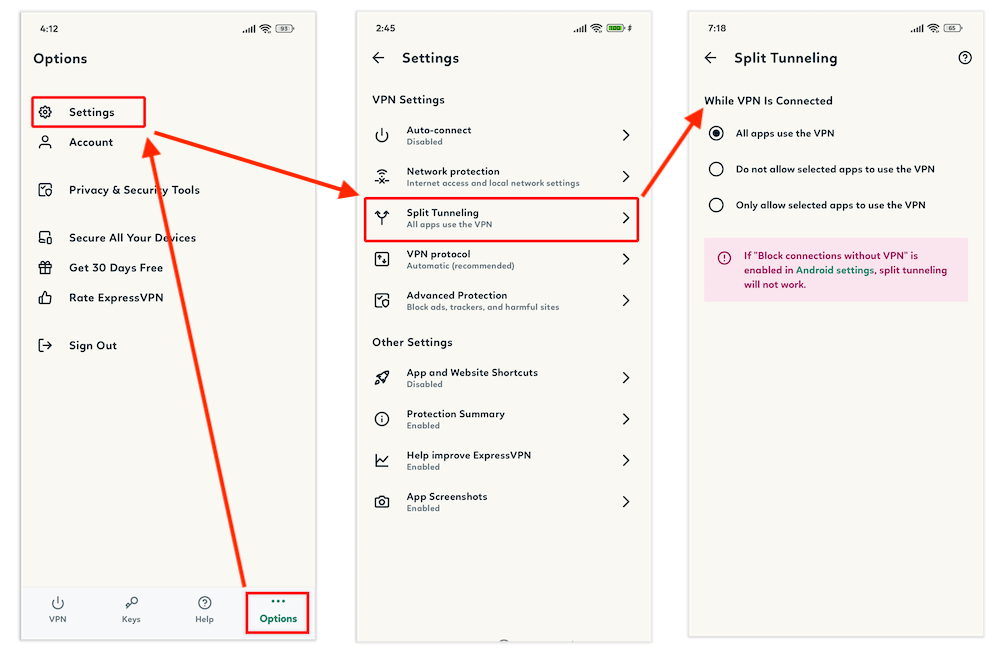
4. Activate Split Tunneling
Split tunneling lets you choose what apps to include or exclude from your encrypted connection. Activate it if you need to connect to a website or service that blocks all VPNs, or if you want slightly faster speeds when doing tasks you don’t need to protect.
5. Change the Android DNS Settings
You can make your Android device use a private DNS server of your choice to completely avoid those provided by your internet service provider (ISP). To do this, open settings > network & internet (or connection & sharing) > private DNS > private DNS provider hostname. Enter a new DNS hostname, like doh.opendns.com, and tap “save” to complete the process.
OpenVPN Setup on Android
If your VPN connection isn’t working on your Android device, you can manually configure OpenVPN. Here’s how you do it if you’re using ExpressVPN.
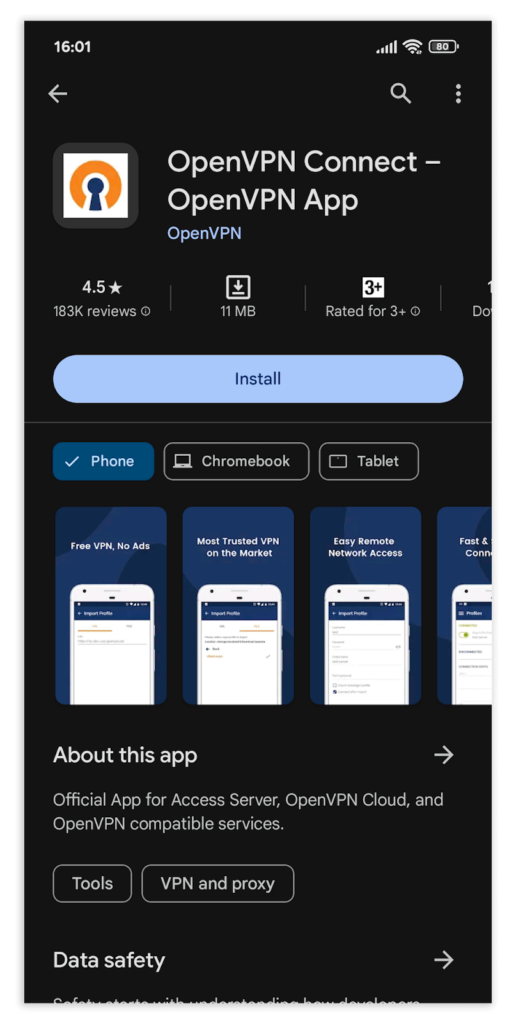
1. Install the OpenVPN Connect App
Open the Google Play store and install the OpenVPN Connect app.
2. Launch the App
Once it’s downloaded and installed, launch the OpenVPN Connect app.
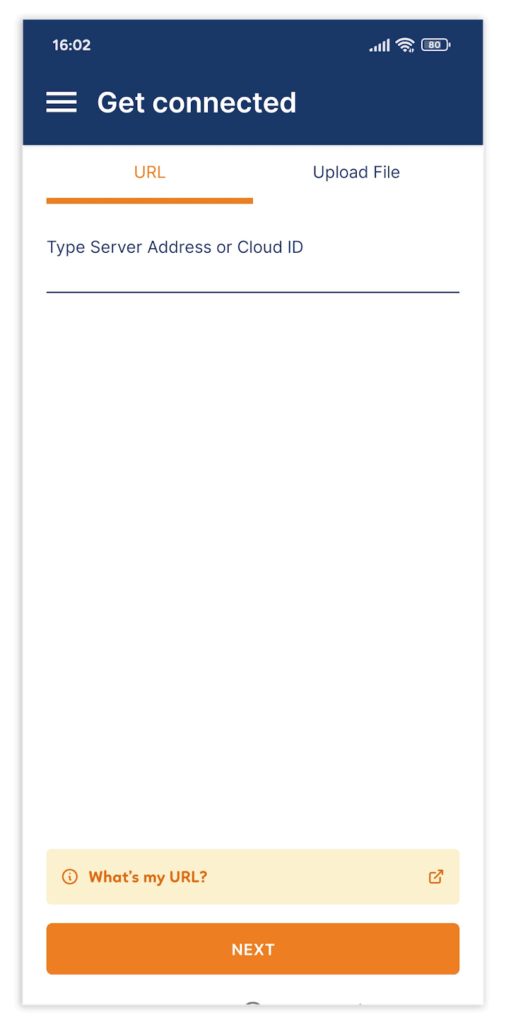
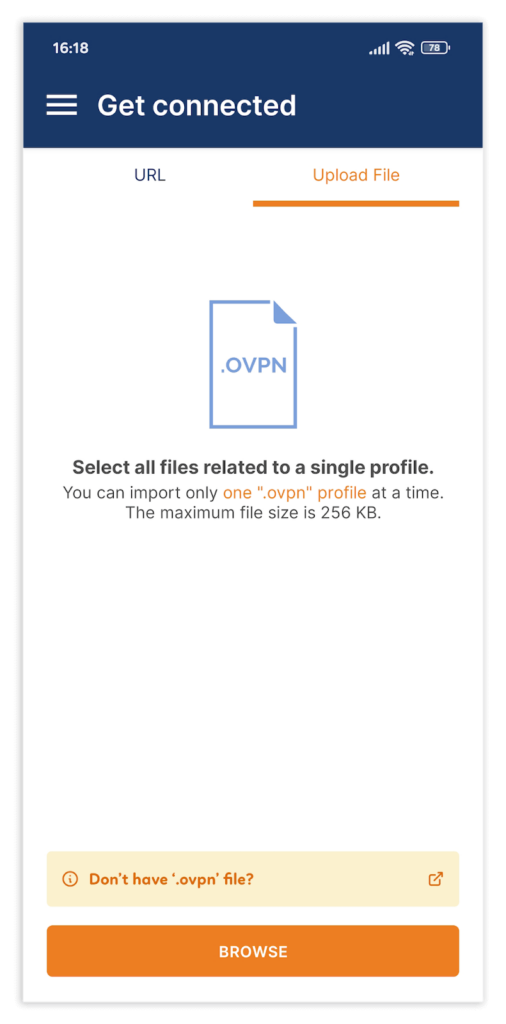
3. Import a Connection Profile
A connection profile contains the parameters, directives and certificates necessary to establish the client-server VPN connection. Import the connection profile from the OpenVPN Access Server by tapping the upload file tab and importing the OpenVPN profile provided by your VPN provider. Alternatively, you can use the URL tab to add the client web URL specified on the OpenVPN Access Server.
Once you add the connection profile, you must enter your user credentials and any multi-factor authentication if prompted. Choose a VPN region and hit “connect” — that’s all it takes.
Android VPN Settings Explained
Different Android VPN apps come with unique settings that help you achieve what you need with the VPN.
- Auto-connect: This lets you set the VPN to automatically launch and connect to the last server you used when you power on your Android device. You can set it to connect when the device starts up, or when you try to connect to untrusted networks.
- Network protection: This kill switch prevents IP leaks by blocking the internet connection when the VPN connection drops. Note that this feature isn’t available for Android TVs.
- Split tunneling: With this, you can choose which Android apps get routed through the VPN tunnel and which get left out. There are two general types of split tunneling: You can either exclude some apps from using the VPN, or you can only allow certain apps to use it.
- VPN protocols: Some common protocols like WireGuard provide better speeds, while others like IKEv2 consume less bandwidth. OpenVPN is sometimes slower, but it’s very stable and secure. Choose the protocol that meets your needs.
- Advanced protection: You can activate extra features like ad, malware and tracker blockers that make your online sessions safer in the app settings. ExpressVPN has Threat Manager, Surfshark has CleanWeb, Proton VPN has NetShield and NordVPN has Threat Protection.
- Privacy and security tools: You can also activate other privacy and security tools to further improve your security. For example, ExpressVPN has a password generator, and NordVPN has a dark web monitor.
Why Use a VPN on Your Android Device?
You need to use a VPN on your Android device to encrypt your online traffic and stop external parties, including your ISP, from seeing the websites and apps you open. This encryption also keeps you safe when you use unsecured public networks where hackers might seek to intercept your traffic and steal sensitive information.
Additionally, a VPN is the most effective way to bypass restrictions that stop you from accessing some platforms. For instance, you can bypass school and work networks that have blocked social media sites, or use a VPN to access region-blocked streaming sites like Hulu, Prime Video or Peacock TV.
How to Choose a Trusted VPN Provider for Android
Many VPNs offer Android support; choosing the right one from the many capable options can be challenging for anyone. Here are some tips to help you make the right choice.
- Android support: The ideal Android VPN must be compatible with as many Android OS versions as possible to cater to more devices. You’ll be best served by a VPN that’s still compatible with older Android versions and continues to provide necessary updates.
- Security & privacy: Encryption and IP leak protection are the bare minimum for a reliable VPN provider for Android. VPNs that also add malware and ad blockers are a better choice.
- Extra functionalities: You need control over what the VPN provides, so features like split tunneling and WiFi network management are important. Standard features like the kill switch should give you options to control how they function.
- Speed: A good Android VPN should give you the best speeds possible, including the ability to bypass speed throttling from your ISP. VPNs with fast protocols and specialized servers optimized for speed are better suited, but nothing beats running a speed test to choose between two services.
- Cost: The ideal Android VPN should have affordable price plans and money-back guarantees. It’s a bonus if it has a free trial or a reliable free version that doesn’t limit too many features.
For additional guidance, see our roundup of the best VPNs for mobile.
Top Android VPN Apps
You now know how to choose the best VPNs for your Android devices, but to make your life even easier, here’s a compilation of the top Android VPN apps you should seriously consider.
- ExpressVPN — Best VPN Overall for Android
- ExpressVPN has an easy-to-use Android app with split tunneling, malware and ad blockers, and parental controls for limiting access to adult sites. There’s a fast Lightway UDP protocol for buffer-free streaming and lag-free gaming, and you can unblock restricted content with over 3,000 servers in 105 countries. Read this ExpressVPN review for more.
- NordVPN — Fastest Android VPN
- Through the stable and fast NordLynx protocol, NordVPN offers the fastest speeds for streaming or gaming on your Android device. There’s split tunneling, IP leak protection and an ad blocker called Threat Protection for extra security. NordVPN has more than 6,300 servers in 111 countries; this NordVPN review discusses that in detail.
- Surfshark — Most Affordable Android VPN
- Surfshark offers the best value for money with affordable price plans and the ability to connect unlimited Android devices simultaneously at no added cost. It comes with two kill switches, a malware and ad blocker called CleanWeb, and a split tunneling feature called Bypasser. Surfshark has over 3,200 servers in 100 countries. Our Surfshark review has more information.
- CyberGhost — Largest Server Network
- If you want to unblock restricted content on your Android device on a larger scale, then CyberGhost will meet your needs perfectly. It has over 11,000 servers in 100 countries, including streaming-dedicated servers. CyberGhost for Android has split tunneling, IP leak protection and WiFi protection for managing unsecured networks. Read this CyberGhost review for more.
- VyprVPN — Reliable Android Security and Privacy
- VyprVPN has over 700 servers with more than 300,000 IP addresses, enough to bypass geo-restricted content worldwide. The Android app is easy to use and comes with split tunneling, a kill switch, public WiFi protection for managing unsecured hotspots, and a zero-logging VyprDNS feature for privacy. Check out this VyprVPN review for more.
- — Best Free VPN for Android
- Proton VPN is the only VPN on our list with a free version. It gives you five free locations plus unlimited bandwidth in an easy-to-use app. Other features include split tunneling, a kill switch, NetShield for blocking malware, trackers and ads, and a VPN Accelerator for speeding up your encrypted connections. Read our Proton VPN review for all the details.
Conclusion
Setting up a VPN on Android is easy. First, you must subscribe to a VPN of your choice, install it from the Google Play store and configure it to your liking. You can then protect your online sessions from unauthorized eyes, unblock any content you want and bypass any sneaky speed throttling from your ISP.
Choosing the right VPN for your Android isn’t rocket science either, and ExpressVPN is the best option on our list. Other alternatives that are just as capable include NordVPN, Surfshark, CyberGhost, VyprVPN and Proton VPN.
Do you frequently use a VPN on your device? Which VPN do you use, and how usable is it? Drop your comments below. Thank you for always reading our content.
FAQ: Android Virtual Private Network Setup
How Do I Set Up a Free VPN on My Android?
You can set up a free VPN on your Android by downloading it, installing it on your device, registering for an account and then using it for all your connections.Does Android Have a Built-In VPN?
Android has a built-in VPN client with PPTP, L2TP/IPsec and IPsec protocols. However, you need a separate VPN app from an actual provider to gain reliable security and the ability to access geo-restricted content.Can I Create My VPN on Android?
You can create and set up a VPN on Android by downloading OpenVPN from the Google Play store and configuring it on your Android device.How Do I Get a VPN to Work on My Android?
You can get a VPN to work on your Android by installing its app from the Google Play store, signing in and then connecting to a server of your choice. This will encrypt your entire device.

Leave a Reply